Monday, February 27, 2012

PHOTOS FOR THOUGHT

Was looking through my photographs and came across a few from a road trip we took a few years ago, exploring the northern Jersey waterfront around the Newark/Elizabeth area.  First, a shot of the old Singer Sewing Machine Plant in Elizabeth(port).  Just behind this structure were the shops for the CNJ, but are long gone now.
How About this for a backdrop structure?
If you try to build this let me know as I will buy some stock in DPM first.  

My port area remains unfinished, although the structures in it are getting close to finished.  One problem I am wrestling with is that my bulkheads look too plain right now - just concrete.  Another problem is that I can't figure out how to exactly render the water.  I know how to make it, just the colors I'm finding hard to pinpoint.  Here's a photo of the Elizabeth River - some food for thought.

Old bulkhead, Elizabeth River
Enough of the serious, now some funny, unless of course you are the owner of this excavator.
Avalon, NJ 2006 - Townsends Inlet  
I think they found a sinkhole.

Lastly,  the coolest toy ever made - Mighty Casey.
I wish I weighed 50lbs still - I'd be the one playing with it.
Mighty Casey was sold in the 1970's.  It was a ride on electric train.  There were a few different cars - a B&M Boxcar, a red gondola, a caboose, and yellow passenger cars.  I had the basic set way back in my childhood and then my mom picked up some additional track sections at a church rummage sale.  There were straight and curved tracks, and also a 90 degree crossover, but no turnouts that I can remember.  We pulled it out in the 90s for my son to play with.  The plastic track works well on hard surfaces or indoors on carpet, but not so great on grass.  No problem, I quickly fabricated some track out of 1x2s with 1x4 ties, held together by drywall screws.  The battery was dead but an old alarm battery worked fine, actually over powered the motor a bit.  Tell me that doesn't look fun.


Thursday, February 23, 2012

JUICIN THEM FROGGIES

What's in the box?
A goodly portion of the turnouts on my layout will be thrown by Tortice switch machines - I'll use the contacts on these machines to power the frogs - but - what about all the hand-throws near the edges of the layout?  I could use the Caboose ground throws with the built in contacts.  I've installed these on our Free-mo modules and they mostly perform well, although they are a little fragile for my liking.  This gets a bit complicated on the layout as the throws are all mounted on the fascia on blogs that would be difficult to drill out and run wires for the ground throw contacts.

 The solution - Tam Valley's Hex Frog Juicer.  This small circuit board works like a charm and is about as simple to hook up as it gets.   The "Hex" means it's good for six frogs - you can also buy singles and doubles.  There is no real cost savings in buying the Hex board over six singles, but there is less wiring.   The Frog Juicer works sort of like an automatic reverser.  It senses a change in the polarity when the locomotive wheel sets cross the frog and adjusts accordingly.  It does this all faster than our DCC system can sense a short so there is no hesitation or cutting out at all.
Juicer #1 Installed
As to the wiring its a no brainer - there are two terminals for a feed from the DCC bus.  It doesn't matter which lead you hook to which terminal - I used 20 gauge wire as feeds but the instructions say you can go as low as 22 gauge.   The DCC terminal is the blue block on the bottom of the board.  The other blue terminal block on the upper left of the board has six lugs - one for each frog.  I used a Cat-5 cable to run a single wire to each frog.  That's it.  It took me less than two hours total, including drilling the holes, soldering the wires to the frogs, and making all the connections,...etc..

The LEDs on the board are indicators.  The one near the DCC terminal indicates DCC power, the rest alternate from Green to Red when the frogs change polarity.  There is also another LED in the center of the board that triggers when a frog has been "juiced".  The LEDs make it easy to be sure the board is doing it's job without pulling out a multimeter.

Jimmy's two EMD Model 40's are now happy little critters.


Sunday, February 19, 2012

FUN WITH PAPER - Part 2

Paper Tanks - BTW, the backdrop color is a base coat and is going to be "hazed" over to dull the blue
Further experiments with paper.....    Last time I showed you a free download paper model that I built.  This time, it's one that I purchased from the same site, Scale Scenes.  Purchasing these models is as simple as paying for them and then getting an email with the how-to on downloading your model.  This "kit" was about 4 pounds, which worked out to be around $6 something in US dollars.  Since you buy the PDF file the number of models you can build is unlimited and only will cost you ink and paper.  This kit comes with all you need to make tanks in a black or a white color.  You can also print the white tank image onto a colored paper, they recommend silver for additional variety.  The kit also comes with concrete slabs, retaining walls, stairs, platforms, piping,...etc.  (10 pages of stuff)  I printed out the file. again at 87% reduction, onto a matt presentation paper.  A printing professional at my Friday night operators group, Diamond Bill, recommended always using paper that is the same brand as the printer, at least for high-quality prints.  The manufactures set their printers up using their paper so while other papers will work, the optimum quality will be with their paper.  Following this advice I am getting excellent prints.  When I adjust the paper options in the printer utility there is a check box for the exact paper that I'm using.
Using door jamb to draw a vertical line on a cylinder - don't use a good door for this as  it leaves a little pencil residue.
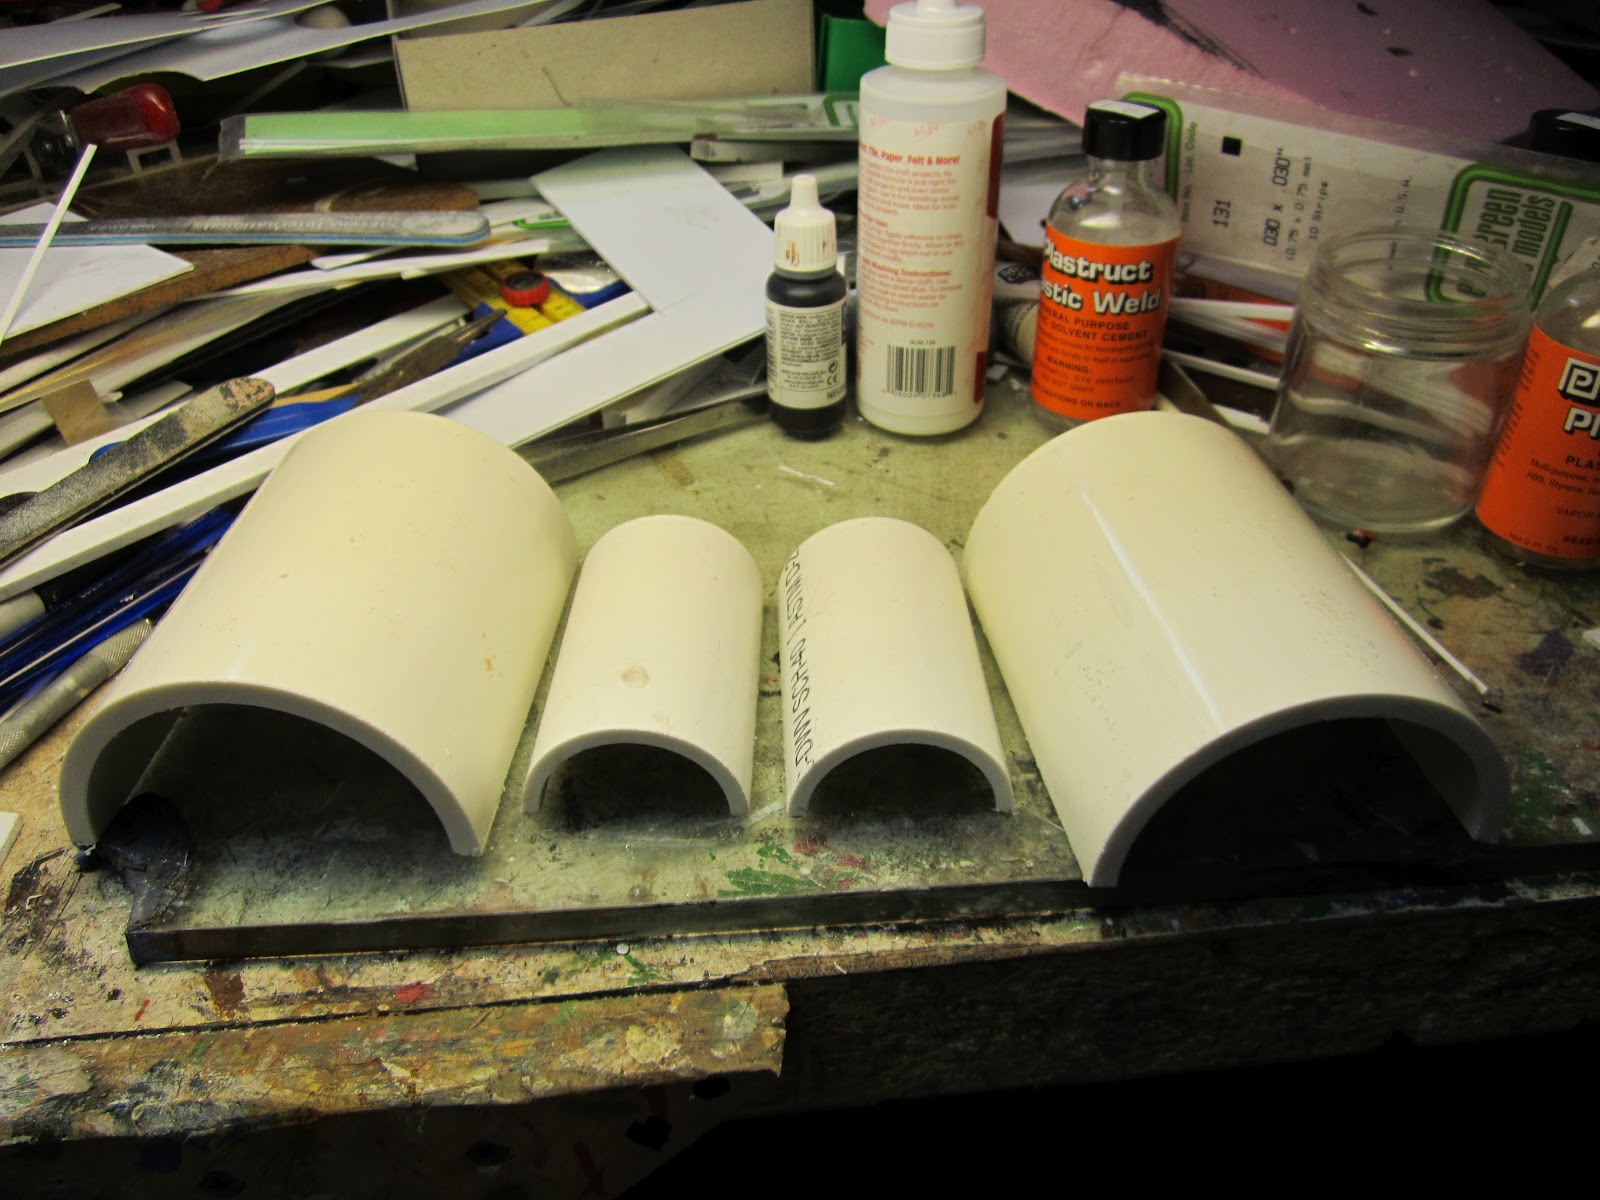
The nice thing about this kit is that the paper tanks are designed to be applied to a cylinder.  Any diameter up to maybe 5 or 6" can be used.  For my core I used PVC pipes with an .060 styrene top.  As I was building backdrop tanks I split the pipes.  To do this I first draw a straight vertical line on one side of the PVC pipe.  I use an old model rocket trick and set the pipe against a door jamb's stop molding.  You then use a pencil to run a vertical line along the stop molding.  To add the second line, 180 degrees from the first, I take a scrap of paper and wrap it from the first line, all around the tank, cutting it when it returns to the first line.  I then fold the paper in half and re-tape it to the cylinder.  The fold line should be exactly opposite the first line.  To cut along the lines through the heavy, Schedule 40 PVC, I used a dovetail hand saw.   After I glued on the half tops, I sprayed the tanks and paper wraps with an adhesive.  First you wrap the sides  of the tanks - cut to extend a little above the top of the cylinder.  This overhang is cut with a razor every 1/4" or so and the cuts are folded down onto the top.   Next the top piece is cut out from a larger circular print - center the tanks on it and trace and then cut - and then glued on.  Results are good for back drop structures and will blend in even better with the addition of ladders, walkways, and piping.

Split pipes - 1.5" and 3" PVC schedule 40 pipe


Saturday, February 18, 2012

RARE BIRD

A Very Old and Very Rare Baldwin VO-660 - Still in Service
Went to check on my sailboat today - spending the winter in the water down on the Chesapeake Bay.  It was nice to get away for the day, even with wires hanging off my chest connected to a heart monitor -  only one more week of this.   Stopped at Woodcraft  in Delaware and bought a very expensive European circular saw that I'd wanted for some time and then a nice lunch at the Bohemia Cafe in Chesapeake City.

On the return trip I persuaded my wife to take me railfanning.  I got this photo of a rare Baldwin VO-660 in the Pureland Industrial Park in South Jersey.  It still carries the paint scheme of it's former owner, Standard Steel.  Standard Steel is located in central PA and manufactures railroad wheels and axles - electric furnaces, forging, and machining operations.  I had a tour of the place back in the 1990's that the Society for Industrial Archeology had arranged.  Interesting operations in a mill that has been the site of continuous iron and steel making since the 1790's.   Watching modern CNC milling machines and forges inside stone buildings that dated to the 1800's was a strange combination.   SMS Rail Services acquired this locomotive around 2004-5 I believe.  I think there are less than a half dozen examples of this model still in existence and three of them are owned by this shortline, along with many other Baldwins - VO1000's S-12s AS16s,.....etc.   No doubt many of them originally used in steel mills.   I've read that Baldwins and Fairbanks Morse locomotives were preferred over the lighter EMD units in mills as there were usually steep grades, like for instance in the approaches to open hearth plants, that these heavy units could handle better.

We also did a drive by of the refinery in Paulboro, hoping to catch another Baldwin switching tank cars, but it must have been deep in the plant.  I'm fortunate to have a wife that besides putting up with all my bad habits for the past 24 years is always willing to take the wheel on a railfan trip.  The trick was I think to wear her down early in our relationship......
1986 - Port Reading, NJ - Bet she was thinking then that this was just a  phase I was going through that I would outgrow - WRONG

Thursday, February 16, 2012

FUN WITH PAPER - Part 1

100% Paper and cardstock
You may remember back a year or two ago I experimented a bit with paper, building an O-Scale barn using techniques I learned about in Troels Kirk's postings on the Railroad Line Forums.   Essentially, this was a scratchbuilt structure and I used a heavy pastel paper for the clapboards and the roof shingles.  I thought the results were excellent and it was a fun break for me.   The same fellow also began using paper  with architectural features, like bricks,...etc.. printed on them.  I was more dubious of this technique as my nature tends toward realism and to me this was a scam, smoke and mirrors, that would be fairly obvious.  The photos he posted, by the way, looked pretty good, but I still wasn't convinced - until - Rick Bickmore, Steel Mill Modeler extraordinaire, started messing, or "futzing about", as he puts it, with this medium.  He has used these paper architectural prints in conjunction with traditional structure models in a very convincing way.

Smoke and Mirrors?  (Put office wall on backwards)
Rick gave me a link to a free online site that will generate brick sheets for you in any scale - You enter the scale, and then pick the brick color, mortar color, and bond pattern- then click and out comes your custom brick sheet.   This site is here.  From that site I stumbled onto another paper modeling site - Scale Scenes.  This is a UK site so some of the buildings have a European look to them, however,  many would  pass for American structures, and usually you have about 5-10 choices for what to use for your wall texture - a half dozen brick patterns plus stone and more, plus a choice of accessories, ie different doors, signs, ....etc.  .  The above structure is a free download on the Scale Scenes site - they have four freebees.   I figured I would give it a try, other than printer ink and a few pieces of cardboard I wasn't heavily invested in this model.
All the parts - printed and some glued to different thicknesses of cardboard
Whether you pay for it or not, you basically just download the file, usually a zipped PDF.  The Scale Scenes site also gives you detailed instructions along with your structure prints.  The next step, of course, is to print out the file.  Now if you are using the Scale Scenes prints you need to first adjust your  print utility to print out the file at 87% .  The structures are designed for OO scale (1:76)  and also they are designed to fit on an A4 sheet of paper.  Scaling the print down to 87% will give you the correct size for HO Scale, and also allow you to print on standard American Letter size paper.   I didn't know much about OO scale and actually just assumed it was an European term for HO as it uses the same track.  What a screwed up scale to model in, although it is very popular in England, at least.  From what I could gather the scale was created as British Steam engines were much smaller than American types so it was harder to fit the motors and drives into these engines in HO scale - things were enlarged a little to OO scale to allow things to fit better, but HO track was still used.  This scales out to 4'1" between rails, well off the prototype.

Make the effort to print out the files to the highest quality.  Then spray the printed sheets with a matte varnish  - a few coats - to protect the image during construction.  There are notes on the sheets as to the desired thicknesses of each part.  You will need to glue the parts to either light, medium, or heavy cardboard, but sometimes just the paper only.  I used a spray adhesive for this.  I sort of jumped a step and printed out the parts on a heavy presentation paper, hoping to skip a step.  Ultimately I would have some difficulty making small folds crisply using this type of paper.  Once I got the hang of things, the model was fun to build and took maybe four hours total.   In part two I'll detail some of the construction pitfalls to avoid and tricks to use.

There is also an American company - Clever Models that make paper kits.  They are all American versions and some look to be quite nice, but if I had to compare the two, I think I like the Scale Scenes better - They seem to have more layers to them, with varying thicknesses too.  Their interiors are also excellent.  Look at the interior of the massive train station model they sell and you'll see what I mean.  The prices are a little cheaper than Clever but not by much for individual kits.  I think the Clever kits don't give you a variety of surface textures to choose from.  There were two things the Clever does that bothered me more than a little - first, on their Freebie page they ask for donations.  What? So it's free, but we are going to guilt you into paying us for the model anyway.  And secondly, they charge less for n-scale and more for o-scale versions - what's that about? Aren't we talking about a computer file?  I assume they just draw this thing once and then adjust the scale, or rather the computer adjusts the scale, so why does it cost more?    Don't get me wrong, I will likely try a few of the Clever kits eventually, but a little bit shady on a few counts.

I leave you with another project -  My wife interrupted my modeling (and dared to enter the man cave) to have me dry brush her shoe.  There was a very small scuff and I had to restore the leopard spots to their glory using some acrylic paints. I don't think I'll do a full blog on this one....
Interruptions 


Monday, February 13, 2012

BY-PRODUCTS PLANT - Part 28

Weathering of Towers Under Way
Quick update - Spent some time weathering the final coolers/benzol washers this weekend.  Getting very close but not 100% where I want them to be.   With a base coat of Floquil Grimy Black over gray automotive primer, I first applied multiple washes - black first and then some rust colors.  I used gouache paints mixed with water, blending the colors from mostly black, white, and raw sienna.   Gouache paints when thinned work well for building up subtle coloration.   They work well on freight cars, however, on larger surfaces like the subject of this blog, it is harder to keep the washes consistent and uniform.  To eliminate some of this variation I got out some weathering chalks and first, using black to mute the colors a bit, and then a variety of rust colors.   These vessels would be hot and thus when wet, rust pretty quickly, especially in the lax maintenance environment of the Amboy Coke Plant.   The lamp shades are a cream color and there is some silvery gun metal Vallejo paint on the valve handles,..etc.   The base is a concrete color - I am trying out a new mix -  Testors Model Master,  White, Gull Gray, and Sand in even proportions.
Another View - You can see the scale of these things by comparing them to the Atlas  Tower just behind them

Sunday, February 12, 2012

COLORS

This has been a subject that has come up a few times in the past month.  I was born in the later 1960's, but I model the 1950's.  My sense of color runs more toward the modern era and I find myself at a loss sometimes when I try to figure out appropriate colors for my model railroad structures.   As most of the photography of that era is black and white, my impression is shades of gray.   Even my earliest childhood recollections of the 60's and 70's I remember lots of blacks and muted colors.  Trips down the NJ Turnpike to our shore house bring memories of lines of black tank cars and sooty refineries.  The local New York Central infrastructure was all greys and blacks, with the occasional jade green boxcar making an appearance.  As the years went on, the blue and yellow Penn Central brought the era of bright colors to the railroad in terms of locomotives and rolling stock.  (Pump your breaks railfans - Penn Central locos were indeed black with a white logo, but in Westchester County New York on ex-NYC trackage they were indeed blue with yellow noses and a big yellow PC logo.)   Industries also became "cleaner", and subsequently more colorful looking as the EPA began dropping the hammer on old practices.   Obviously there were also improvements in coatings and pigments that enabled more of a color variety on an industrial scale.

Chicago Steel Mill in Color - early 1940s - fireboat in foreground


So what do I use for reference if most photos are black and white from that era?  Indeed black and white was still the film of choice in the 40's and 50's, however, Kodachrome color transparency film was released in 1935 by Kodak and slowly found a following.  These color photos can be found in the beautiful Morning Sun books released on almost a weekly basis it seems.   If I was a hedge fund manager I'd probably buy every title released, but they are for now, an pricey item that I splurge on only for titles that are truly important to me - Steel Mill Railroads, Critters,...etc.     For the budget minded there are a few online sources for color photos of this era.  Truly the most outstanding photos in terms of resolution and composition are those on the National Archives site - I don't have the link but they are in the Farm Security Administration/Office of War Information collection and date from 1935-1945.  There are plenty of railroad and industrial shots, including a few dozen steel and coke photos, and browsing through the collection will give you a good feel for the colors of the time.

East Chicago, IN Steel Mill - Check out the B&O E Units

Another source came to me via todays New York Times.   Charles W. Cushman, a traveling salesman, financial analyst, and most importantly, an amateur photographer, started taking photographs of virtually every subject conceivable in the 1930's using Kodachrome film.  His travels took him throughout the United States and overseas.  He donated 14,500 of his slides to his alma mater, Indiana University.  They have digitized the collection and lower resolution images are available online .   There are many industrial, marine, and railroad related photos in this collection, but sometimes just the mundane street shots are just as interesting in terms of colors of the 1950's.   All the photos in this blog are from that collection.

1940's Johnstown, PA - Lots of black, grey, brick tone, and earth tones

And there was also some vivid colors,....