Thursday, November 27, 2014

HAPPY THANKGIVING

Thanksgiving at the shore as usual.   A recent nor'easter had uncovered some railroad tracks buried in the sand at Cape May Point, so we shifter our Thanksgiving Day walk on the beach from Avalon to Cape May.    The tracks were associated with a sand mining plant at the point which closed in the 60's or 70's.  Sand was dug along the beach and hauled by rail to the wash plant and rail car loader located about a 1/4 mile east from these tracks.  The plant was effectively the southern end of the Pennsylvania-Reading Seashore Lines trackage.  Located in the dunes, a hundred feet or so from the ocean, you couldn't really go any further south in New Jersey.     This looks to be only a section of track and not a continuous line that got buried.  My guess is either a storm buried the track and they just removed the unburied trackage and shifted the line, or they were in the process of moving the track sections to mine another strip of beach and this one got caught in a storm.    It looks narrow gauge in this shot, but the rail has just shifted off the ties.    The section of rail is in a tidal outflow which generates mini-rapids during the outgoing tide.    Who knows how long it will be before it is covered again


Sunday, November 2, 2014

ANOTHER WAYNE COLE STEEL BOOK - GHOST RAILS XI


A few weeks ago I received an announcement from Wayne Cole that his newest Ghost Rails - Volume XI was finished and available for purchase.   Like Volume X this is another large hardbound box devoted mostly to the steel industry in the Shenango Valley.    I promptly ordered and received a copy last week.

If you aren't familiar with these books, Mr. Cole I believe self-publishes them.  Most are related to forgotten railroads, traction lines, and industry in western PA/easter OH.   Because they are self published I've heard some criticism on things like photo quality, organization and editing, and lack of maps and visual aids.  These are valid issues - Mr. Cole even goes so far as to acknowledge them.  In his preface he writes: "Volume 11 is complex and confusing in areas" and suggests having the content guide and a topo map handy while reading.   Despite this, these books have been my favorite steel industry related reading.  The books are full of photos and descriptions of processes and rail movements within the mills.   At a base level, this is what I personally want to know about the steel industry.   For example, the history of a certain mill, say a rolling mill is interesting - when it was built, who designed it,,...etc...  but I also want to know how the raw steel for that mill is delivered and handled, and how the rolled products are shipped and where too.  These books are full of this sort of info.  So far I've leafed through twice and read most of the captions and looked at the photos.  Like Volume X it will take me a month or two to really go through the book.  Well done again Mr. Cole.

Forthcoming Volumes are to cover Youngstown (XII) and Warren (XIV)

Monday, October 20, 2014

Coincidences.........

Sorry for lack of blog posts of late, but business is growing too fast and spend most of my waking moments trying to keep up.   An opportunity presented itself for a last minute weekend getaway this past friday.  Hastily planned, we resolved to go somewhere within a few hours driving distance that we haven't been before - difficult given that we mostly travel within a few hours of our house on our weekend getaways.   Since we like antique stores, I consulted the guides I keep on my desk and found a cluster of antique stores around Hagerstown, MD - Gettysburg, PA.  I'd been in the area before with my son when we used to do father and son Civil War battlefield trips when he was little, but never with my wife and not for shopping purposes.   About halfway there I got recalled that the regional NMRA convention was possibly in Hagerstown, although I also thought maybe Virginia, and I wasn't even sure which weekend.  Well it was this weekend and was in Hagerstown.  So I guess I could have gone, but since it was a last minute call,.....  

We had a great weekend - bought lots of industrial artifacts - ate mostly good food - and saw some new towns and villages.   I stopped at the Western Maryland RR Museum in Hagerstown  late Saturday afternoon after a jaunt down to West Virginia, and bumped into now fewer than 4 model railroaders I knew.   They probably think I've lost a few marbles with my explanation at how I ended up in Hagerstown the same weekend as the convention.

Besides the antiques, the posted photo's show a real neat find in the C&O Canal Park at Williamsport, MD.   This is probably one of the neatest little moveable railroad bridges I've ever found and it cries out for modeling.   The bridge was built by the Western Maryland Railroad in 1923 to access a newly built power plant built on the strip of land between the canal and the Potomac.  The canal was still in use at the time so the bridge had to be built in a way to allow clearance for both the canal boats and the mules and towrope pulling them.  This led to the unique configuration shown in the photos.  Ironically there was extensive flooding the winter after the bridge was completed and the canal never reopened.  The bridge was only raised a few times to protect it from later floods.  The spur was abandoned in the early 1970's when the plant switch to truck deliveries of coal.

Sunday, July 27, 2014

SPRAY PAINT, STORAGE, AND ELECTRICAL POLES

Once again I haven't had the time to follow up with additional posts related to my new cutting machine.  Hopefully I'll start to assemble the gas washer I started a few weeks ago,  very soon.  In the meantime......

SPRAY PAINT -  This is a Liquitex can of spray paint I picked up the other evening.   It's the first that I'm using this product line.  I've used liquitex acrylic paints for years and like them.  The spray paint is low odor and while wet can be cleaned up with water.   There are a fair number of online reviews relating to the tips clogging.  This is common with water based sprays I've noticed.   I use a Zinzer water based spray primer and it behaves similarly - clogged tips and sputters if you don't keep the tip clear.    As I use these paints,  I guess I'll figure out how much of a pain in the ass this becomes.   What I do like, is the range of colors, and not typical bright pastel colors, but lots of earth tones and industrial looking colors.  The cans are 12oz, which is four times as much paint as the Testors or Floquil cans.   The price varies, but figure on around $6, which is slightly more than the Lowes/Home Depot Rustoleum or Kyrlon Cans.   I managed to pick up two on sale at Michaels at $5 a can to try.   I bought an industrial light green color that I might use on my port crane, and Raw Umber #7  - This second color is the best I've seen to approximate weathered concrete.  I do also like the Rust o leum light brown camouflage color for this as you've seen in the past, but I think this is slightly better as it's a touch lighter.    You can go online to Blik Art supply and check out there range of colors.

One pass made for rabbets - awaiting second pass

STORAGE -  With the limited space I have in my basement, my scratch building supplies and parts are scattered in many plastic bins and boxes.  I want to get a more organized system as the one part I usually need is the only one I can't find.  Taking a page from the old drawer/bins found in general stores and hardware stores I experimented at my shop with developing a system of mass producing sturdy and cheap storage bins.  I'm using 1/2" MDF for the entire drawer and they are roughly 6"x6"x12",  but really any size could be made.  I want to be able to create some simple plywood shelves that these bins will fit into.    MDF is super cheap, but I also wanted to not spend a lot of time on these things.   The fewer machines and operations the better -  All the cuts were made on a table saw with a regular blade.  The only other tool needed was a brad or pin nailer to assemble the drawers (the glue really holds them together.   The fronts have a notch, or in woodworking as it's known, a rabbet, on three sides, and the sides have rabbets on the two long sides.  The bottom has none.   If measured correctly, the pieces will fit together nice and tight, with the glue doing the real work, and the brads just to hold things together while the glue is drying.   I fashioned some cheap simple handles from poplar using a few passes on the table saw.  Hopefully the pictures tell the story, but if you need more info just drop me a line.
The five pieces of a bin/drawer

Assembled - these 8 took about 2 hours from raw MDF to built
Cheap easy handles.  I might use the handles typical on the old library card catalogs as they have a slot for a label.  


Getting late so I'll cover the Electrical Poles in detail in a future post.  Briefly I wanted a look that you see in a lot of steel mills - tall narrow towers as opposed to your typical hi-tension poles.  The BCH towers fit the bill, however, they were slightly short I felt.  I added a short section from the Walthers electric tower kit to the bottom of the BCH tower and then added a concrete foundation.  Still playing around with the design a bit but here are some preliminary results -


Sunday, July 20, 2014

STEEL FINDS

While antique shopping last weekend I came across these two wire rope artifacts and purchased them.  One was a full spool and the Bethlehem one, just a half.   Also note the Penn Central timetable from 1970.  It was a few bucks but interesting reading - good info on trains and also on industrial sidings along routes.  Posted track speed limits were a crawl in many places - too young to remember but physical plant sounds a mess.


I also picked up a few other time tables for $1 a piece - a couple PRSLs from the 50s of local interest and a ACL very nicely done booklet - last station stop Havana.   While at the Reading RR Historical Museum (photos of equipment in earlier blog), I picked up some back issues of there magazine - the Bee Line.  Specifically I picked up the very well done issues (3 part) on Bethlehem Steel's Grace Mine and another nicely done article on the massive railroad tie creosoting plant at Port Reading, NJ

A few models here and there.   At a visit to a Robot museum/store I grabbed a model of the robot from the 70's (I think) TV show Lost in Space.  Also elsewhere, a 1/144 scale Dragon model of a WWII German Railway gun - nice brass etched detail parts and a turned aluminum barrel.   Nice mix of reading materials, trains and models, and industrial artifacts.

Saturday, July 12, 2014

NARROW GAUGE

Plymouth critter     Supposedly from Carpenter Steel in Reading Pa

ALCO. C-630

Last surviving ALCO C-630.     Hamburg, PA

Monday, July 7, 2014

HO MODELING WITH THE SILHOUETTE CAMEO - Part 3

Really getting back on the blogging wagon so to speak.  Partially as I'm excited about the Cameo and the potential to assist in making precise parts.  I'm a bit nuts about precision and nothing ruins my day more than having one component slightly off and messing up the whole structure - maybe not ruining it - but something that will bug me every time I look at it.   I did some intricate stuff with the roof truss cutout in Part 2, however, I really see me using it more for basic parts for structures.  I figured a good place to start is the gas washer complex for B-Furnace.   It's a rare mostly free-lanced structure for me - I'm using some measurements of similar washers from HAER drawings, but using photos I took at Bethlehem Steel last year from the deck of the arts center of the washers for either their B or C furnace.   To refresh memories, B Furnace as a dust catcher modeled on a prototype formerly at Central Furnaces in Cleveland (most of Blast Furnace B is based on that prototype, except for the furnace stack itself which is partially based on USS Duquesne #3 furnace) .   There is no precipitator in this complex as both furnaces share a dual precipitator plant modeled almost exactly on the prototype at Bethlehem A furnace and located behind that furnace on my layout.   The washer plant has two main wash towers and two downcomer pipes with additional water sprays in them.   There are multiple platforms on all four towers.  Getting the platforms to match is always tricky and my previous method was to create one and then use that as the template.   This time with the Cameo, I started by drawing the base plate in Silhouette Studio.  I then copied this drawing to use as the basis for all the platforms.  Since everything should be in exactly the same place, I'm hoping the pieces will naturally align the towers and maintain the same spacing throughout.
Initial drawing

In addition to the base and the platforms I created the caps for the upper part of the washers, many platform supports (very small pieces) and rings for some sort of donut ring of undetermined function near the base of the down comers.    I fit the whole thing on a single 12x12 sheet, the max the Cameo can handle.    I started the cut using a sheet of .030.   If I haven't mentioned it before the Cameo uses a cutting sheet - its a 12x12 tacky piece of acetate with a grid that matches the drawing screen.  The sticky nature of the sheet is good when cutting thin plastic and paper and card stock as it holds the pieces in place that are complete cutouts - without it these would fall off and get jammed in machine or even shifted and then cut again.  With .030 and .040 plastic I've omitted using the cutting mat as the machine doesn't cut through the thick styrene so no worries.  I also am feeding in media that is probably a little thicker than the machine is built for so not having the mat keeps the thickness down.
Smaller drawings - less components

For whatever reason, the plastic shifted and the cut shifted out of whack halfway through.  It also had trouble with the cuts close to the edges and with the knife running off the end of the styrene and not being able to get back on.  So I broke the components down into 4 separate files and am cutting them one at a time using 9x9 sheets of plastic.  I reduced the cut window to 6x6, but I wanted some extra room on the plastic to prevent run-off.   Also, the feed roller can only be moved in to about 8" so there would be a feed problem with smaller plastic, however, you can feed smaller pieces of material in using the mat, just not the thick styrene
Cracks and seams added to drawing of base

I thought about it and went back to the base drawing and added concrete pad seams and also cracks.  The cracking was done using the freehand draw function.
Gas Washer base - used some pencil graphite to emphasize the concrete seams and cracks .  Also notice the platform supports - broken off and a strip behind of additional pieces.

I cut out the base on .040 styrene and no problems occurred during the cutting with the 9x9 piece.
Base with towers dry fitted 

The circles on the baseplate basically mark the exact locations of where to glue the towers.


Saturday, July 5, 2014

HO MODELING WITH THE SILHOUETTE CAMEO - Part 2

I was able to pick up a variety of plastic in the larger format Evergreen sizes (12x24)    Cut in half they fit in the Cameo perfectly.     I altered the roof truss file shown in part one.  I decreased the size just a little to fit the real estate on the model railroad that I've staked out.  Easy to do and it was described yesterday under the Scale function.  I also duplicated the entire truss to cut out three per sheet.  There is a Duplicate function - learn to use it as it makes things go quick.    Most of my next file I will describe was done using Duplicate.    I also added cross bracing for the sides of the buildings.  I did draw this, and then duplicated into two.  I found it easier to draw this x bracing if I drew a rectangle/square first and used that as a guide for placing my lines.  I later erased the rectangle along with my overlap lines.   Actually leaving the rectangle might make it easier to break the pieces out.  
The revised cut file - additional trusses and cross bracing

I put a sheet of .015 in the Cameo and let it do it's thing.  I wasn't looking at the time exactly but I'm guessing the cut took about 20 minutes.   I set the blade all the way down and set the machine to double cut.  Even with this, the pieces still had to be bent and broken out a little.
Cut sheet of .015 styrene

Once the parts were separated, I used .030x.060 strip styrene to laminate to the truss frames to create an angle steel look.  It is still tedious - I cut and fit each piece and it took about 20-25 minutes to make up one truss.  If I set up for mass production and pre cut all the members it would go much faster.   One side received the strip on all members.  The piece still felt a little flimsy so I added additional strip on the opposite side, but only on the primary structural pieces.   It's still work, but I'm happy with the results and more importantly, the trusses will maintain a consistency that will help keep the entire structure neat and proportioned.   They look a little finer and much better than what I've done in the past with jigs.   I still have many buildings to construct so I'm sure I will be building lots of these.   I will probably go back and do the trusses of the stalled soaking pit building using this method.
Cut out, ready for assembly

For the cross bracing, I used .030x.125 strip between the pieces.  This packs the bracing out to fit nicely between the web of  1/4" H columns .
Final products

My next experiment is using the machine to score thicker, .030 plastic for the gas washer plant for B-Furnace.  I'm basing the structure on photos and some HAER drawings but it's free lanced.  The dimensions are fairly accurate I believe.  


Friday, July 4, 2014

HO MODELING WITH THE SILHOUETTE CAMEO - Part 1

Well a day off.  Virtually no excuse to work today except on some paperwork.   We did go look at a house today - perfect set up - three landscaped acres, nice house, three car garage with finished second floor, in-ground pool, short sale so could get for $100k below market value,  etc.   Then I opened up the Bilco door to the basement -  CRAWLSPACE - ugh.

The raw material....

I finally had some time to play around with the Silhouette Cameo a little today.   As I mentioned in the previous  blog entry, I intended to try out cutting a roof truss for large industrial buildings.  The Cameo cutting area is 12"x12" so you could do almost any truss for an industrial building, and could maybe even layout diagonally if you needed an inch or two more.   My original plan was to draw this in the free drawing program that Silhouette puts out -  Silhouette Studio v.3,  however,  after some playing around with the Trace feature of the program, I tried using an existing graphic as the basis to make things a bit easier.   A quick search of HAER documentations I quickly picked the above drawing of the Sloss Furnace blowing engine house.   I downloaded the highest resolution TIFF drawing and cropped the top portion of the drawing.   The truss on this building is about 72 feet wide - perfect for HO steel mill buildings.

The next step is to use the Merge function in Silhouette Studio to import this image.  This is the image merged onto the 12"x12" cutting mat background.

Trace Function

Now use the Trace function to "trace" the image.   The red lines are the actual cut lines that the machine would cut into your material.  The black lines of the original image wouldn't be cut, however, you could print out them first on your regular printer and then feed that print into the Cameo and it would cut along the red.  This would be useful in paper modeling, but you can't feed plastic into your printer.    It would be nice if it were this easy, but the trace function is imperfect.  There are filters and other variables to adjust the Trace function that might improve the result, but this was what seemed to work well.   Besides the walls and crane that I don't want to cut, if you zoom in, and you can zoom in quite a bit (something that is useful in cleaning up the cut image) you will see the computer literally traced all the lines - the truss members are two lines, but the red cut lines placed by the Trace function are on both sides of each line, so there are four cut lines - it literally traced the black lines as if they were images.  You need to clean up the drawing.  It's some work, but not as much as drawing from scratch.  There is an eraser tool which helps with a lot of the extra images but be careful within the lines themselves.  If you are using the erase tool it's best to zoom in all the way as you will have more precise control.    Easier yet, is to use the Select pointer tool to select lines and then click delete.   This method is faster and cleaner, however, you need to make sure what you select isn't attached to the larger image and deletes more than you want.  If you do, you can always use the Undo tool in the Edit menu to take a step (or five) back.   You will also find that you will need to fill in a few places with new lines.  Use the Line tool in basically a connect the dots fashion.  You can also adjust the lines if a little off by clicking on them with the select pointer and change the angle or length.    The idea is to make sure you have continuous cut lines all the way around so you won't have to cut your parts out.   Also, make sure to erase all intersecting lines so the part is all one piece.    One interesting problem is that the original Sloss drawings were hand drawn by a human (pre-CAD documentation) so when you zoom in, slight human errors in the lines become more pronounced.   I cleaned up a few but left others as these errors are relatively small and not noticeable.
Final cut drawing
This is the final drawing, ready for cutting.   I did rescale the image a little at this point - based on the original drawing, the truss should be roughly 72 feet wide.  In HO scale this works out to be just shy of 10" so I adjusted the drawing using the Scale function to get close to the HO size.  The first cut is about 69 feet so I go pretty close and would be easy to adjust a little more and get perfect.   Merging and cleaning up the image took about an hour.

I'm out of .010 plastic so I did a test cut in cardboard stock.  It's easy to copy the entire truss so ultimately this file will have two or three more trusses to fill the page.   Once I get some plastic (tomorrow) I will play around with some options on actual construction.  My plan now is to use this as the core for the truss and just cut and glue on strip styrene or angles to stiffen and give the truss depth.   I'm very happy with the results.   I will probably use these trusses for the roof of my to be built rod mill.   After I publish this entry I'm actually going to cut another truss or two and explore using the cardboard (it's called chipboard by Silhouette) as the truss - laminating them.  Just an idea.


Wednesday, June 25, 2014

NEW TOY

A few brief comments first -

As much as I would like to update my blog more, there just isn't time of late.  I've gone from busy to super busy to super nova busy with my business.   Sixteen hour days, seven day weeks have been the norm of late to barely keep up.  Besides all our local work, and there is a lot of that, we took on five shore projects this spring.  Three were done by the Memorial Day deadlines but two are still ongoing.     Three of the houses were beachfront and two bay front so the views were great, but that can be a double edged sword when you are swinging a hammer for hours watching others relax  (ok we really don't swing hammers a lot as we have a dozen or so nail guns)   I'm trying to hire another carpenter or two, which isn't as easy as it sounds.  There are plenty out there, but out of every 100 carpenters only a half a dozen or so have the skills I need and the work ethic, and of those half are in business for themselves and the other half well paid elsewhere.   It's ironic that two of the best prospects I'm looking at right now, both have college degrees from good schools, but have been under employed or not employed for the 3-4 years since graduating and are looking toward construction as a viable alternative to traditional college career paths.  Both have excellent mechanical and craft skills, which is why I'm talking to them, however, I get calls almost daily from customers and other contact looking for basic laborer jobs for there college grad kids that have been sitting home for months or years watching TV and sending out resumes.  Construction laborer positions will pay better than most retail or service industry jobs.   And yet there is the continual brainwashing that a college degree is a panacea for improving your life, oh and don't worry about the mortgaged sized loan with credit card interest,..... I'm not against college mind you, I have a degree, I just don't think it's a fit for EVERYONE, and I think within the next ten years or so you will start to see a dramatic shift in that college degree vs high school degree lifetime earnings comparison.      Anyway, enough ranting, but this does bring me to my next subject -

This blog is not a public forum or bulletin board,..etc..  It's my blog and my opinions.  I don't consider myself a brilliant thinker, so about half my opinions are probably wrong or misguided, maybe more.  This is basically a stream of consciousness (if you haven't figured that out already) so I say what's on my mind.  Since I haven't been doing much work on trains, but still buy a book or two, I've taken to posting frequent book reviews.   My review, as it should be, is what I think of the book from my, possibly misguided perspective.   Some of my recent reviews garnered a lot of hate comments - I switched to moderated comments and didn't post the nasty stuff, but after thinking about it, I'll post all comments, except for the dude in India that wants work as a consultant.   These comments coincided with my FU to the steel mill group, well more precisely,  the Youngstown Industrial Tea Party and associated sycophants (i think there is a Buffalo branch too), so that might have precipitated the volume of hate mail.   My favorite comment was "Jim - your fat"    This guy must by auditioning to take over that Captain Obvious TV commercial role.    So if I don't like a book, that's my opinion, and if you want to call me (or my mama) fat, go ahead.
NEW TOY

Now fun stuff - I've been thinking of purchasing a 3d printer, laser cutter, or small CNC machine for the past two years, but have been hesitating of the cost vs value equation with these things.   Either the resolution sucks or the machines are ridiculously expensive.   I think that the common 3d printers using ABS plastic filaments have limits in terms of resolution - all that money and time printing and you still have a lot of clean up and probably need to make RTV molds and cast the part in resin anyway so you can paint it.   There is a startup, and I forget the name, making reasonably priced printers using liquid resin - I think this is the future for modeling small parts, but I'm not sure I want to get in at the ground floor - wait a while for the machines to improve and prices to drop ( I remember a customer of mine purchasing a 42 inch plasma TV back in the late 90s for over $10,000) He was the only one that had it then, but,.....

I started to think of priorities,  i.e. how would one of these machines make my modeling easier and more importantly better?    Some priorities -

  • Repetitive cutting
  • Accurate and consistent measurements
  • Speed
  • Ability to cut styrene sheet, which I use a lot of 
I was looking at some CNC machines but the concern was that the spindles would melt the styrene while cutting and due to the round bits, not have the precision or sharp corners that I would like.    There are some people on the internet using them for styrene cutting, mostly in Europe, with some success, however, a much cheaper alternative presented itself to me.  It's far from perfect and can't do everything I like, but based on first impressions I'm excited.  
Machine at work

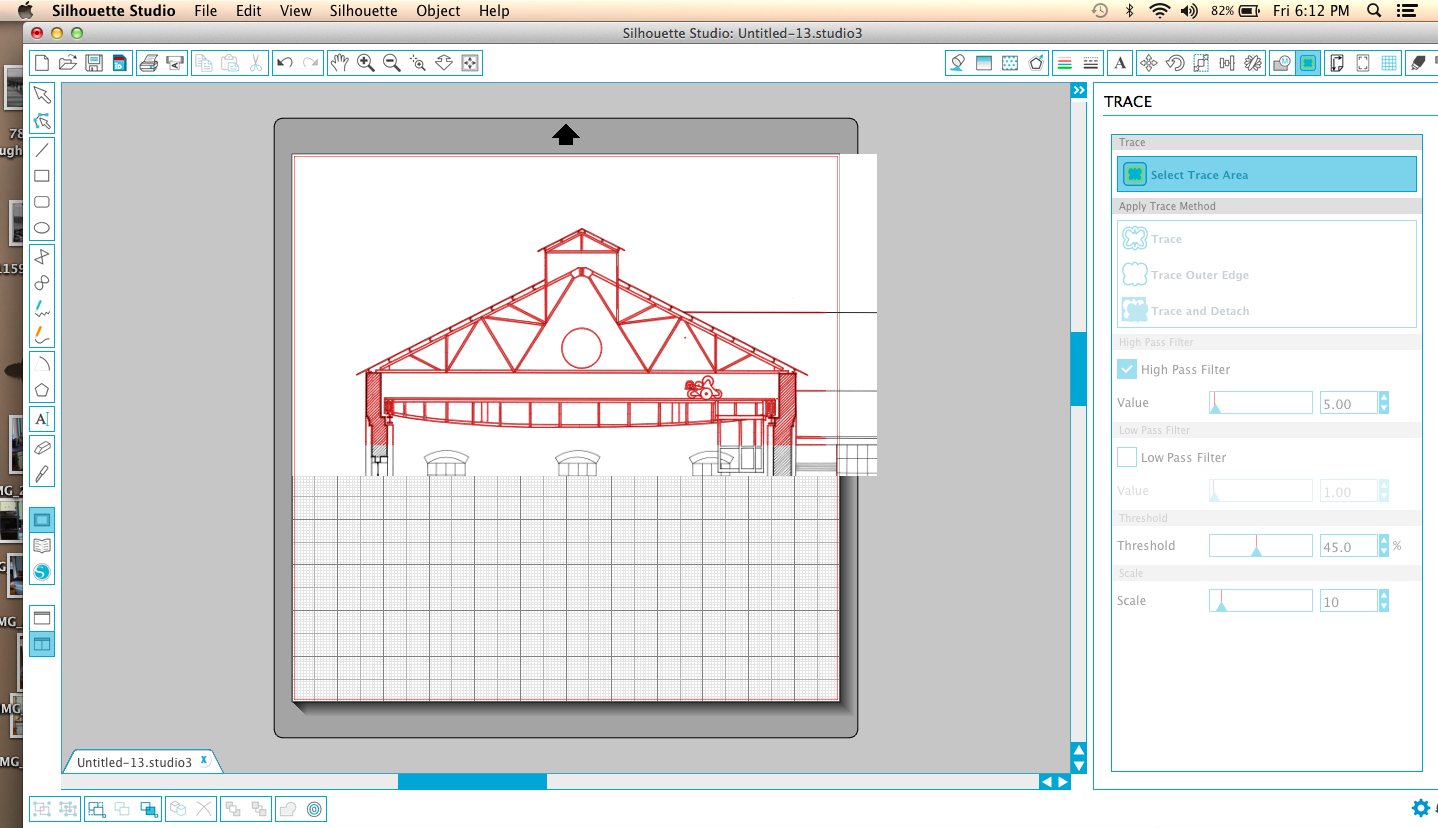
This machine is the Silhouette Cameo.  I'm came across it on a few British model train sites, as well as Star Trek modeling sites and electronic prototyping sites.   It's original market was for scrapbookers, so your local Michaels or AC Moore should have it - I purchased it online.  It's a cross between a printer and a CNC machine - similar to a large plotter.  The moving head takes a small pivoting cutting blade - it can also take markers .   I believe these type machines have been used for a number of years by vinyl sign people, however, this is I think, the first home version.  The price is right at $265 and the software that operates it is a free download.  I downloaded the software and played around with it a bit before ordering - this is important as any type of machine can only execute what the computer tells it to, so you need to be able to use the software if you expect good results.  
The cut

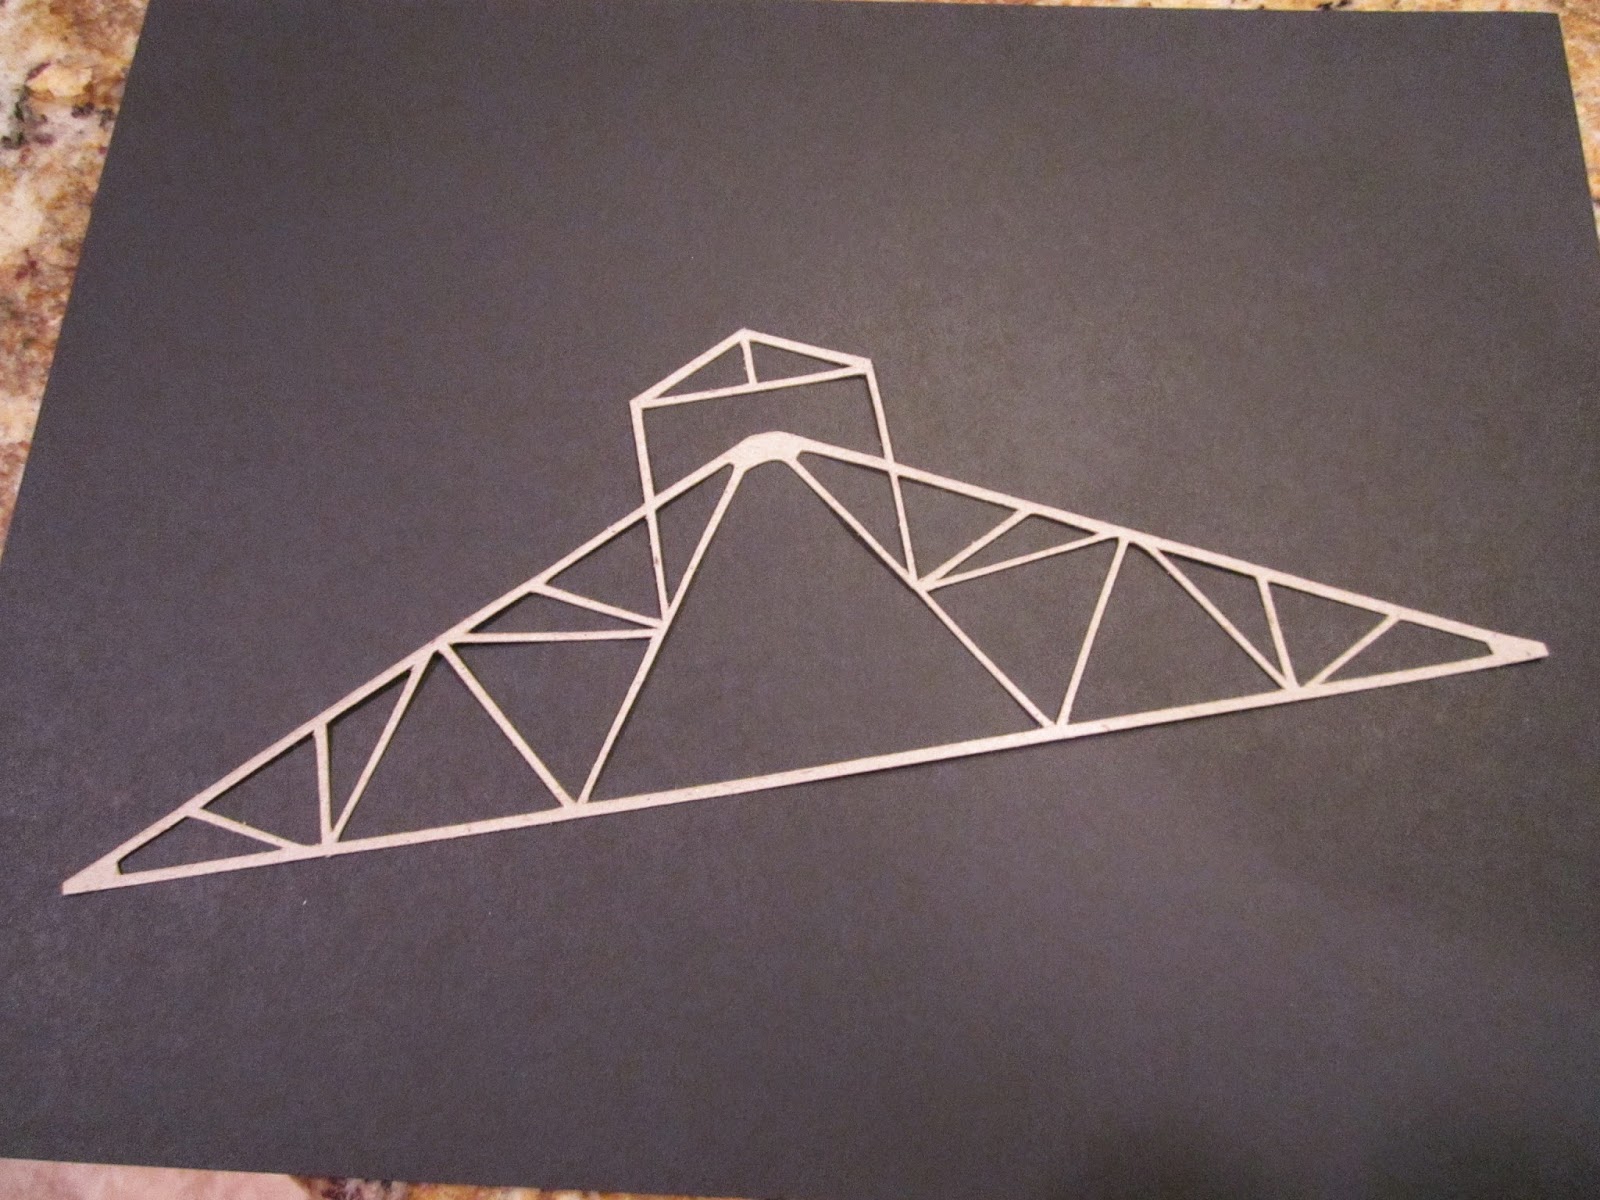
For a cutter, you can make incredibly detailed cuts, and hurray, it will take styrene, although, you won't see that material listed anywhere on the box or any advertising for the product.   You are limited on thickness as the blade is very tiny.   Here is what I was able to do on initial testing - 
  • Cut .010 and .015 styrene through completely
  • Score .020 styrene - easy clean breaks along the score lines
  • Score .030 styrene - straight line cuts are nice clean breaks but curved and tight details will need some light cleanup
  • Score .040 styrene - sweeeeeeet - a little more clean up, but think dead-accurate multiple parts
  • of course card stock, paper, etc - this is what the machine was designed for.
  • It also does temporary tattoos - I don't know much about this but it was mentioned on-line that this is similar to a decal and might be useful there - something to explore. 
  • Vinyl lettering - think control panels - side of your truck - want to put 12" high letters that spell out Pennsy on your fascia,...etc..  
  • Billboard or building lettering - you could cut adhesive paper and use as paint masks
I'm super psyched about the .040 styrene - most sites said you couldn't, but I think they were trying smaller parts - I'm looking at building walls etc.    The high line project stalled because of the tedium in cutting out the six individual styrene parts for each bin x 20 or 30 more bins to do.  The machine would do all this - all I would have to do is insert the styrene sheet and click start and then break out parts and a light sanding.    
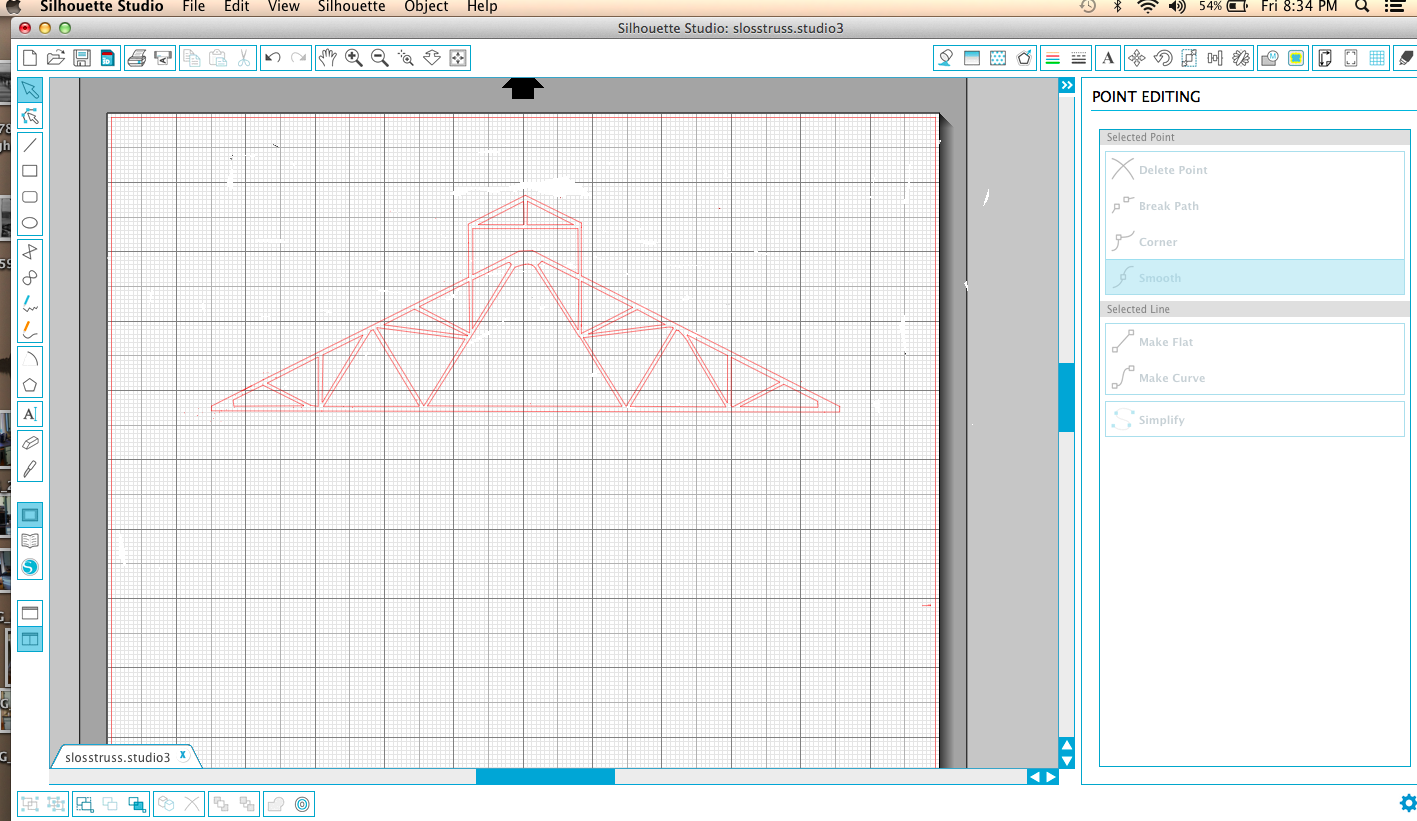
The free drawing/cutting software - very easy to use

Forget the pain in the ass circle cutters - it takes two seconds to draw a circle or ellipse to the exact measurement you need.   
First test parts

You can see my first test run - I spent about 10 minutes drawing these parts and then put in a piece of .015 styrene.  The parts separated cleanly and most of the cuts were all the way through, or at lest 95 percent of the way.   You can see from the one piece that I was playing around with a railing design and notice the finer verticals and horizontals that I was testing to see if it could do.  The truss design was simple and quick - Im thinking off building up multiple layers.    Also a window and some small circles.  


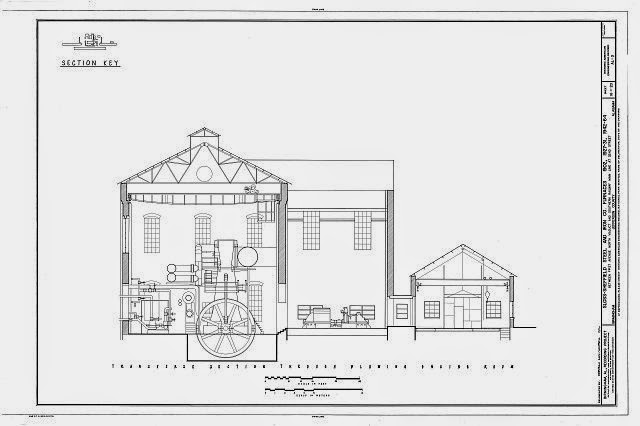
I'd like to come up next with an industrial roof truss design with several layers of .010 and then strip styrene flanges.    Stay tuned for more of this machine....


Wednesday, May 14, 2014

NEW YORK CENTRAL LAND (AND NEW HAVEN)

A cancelation of our annual Boy Scout Car Show fundraiser, where we man the grill for the day, led to a rare day off for me.  To be sure, I could have worked as I have an incredible backlog of projects, but my wife was visiting her mom up in New York, so I joined her.    It was one of our typical road trips with a plan formulated on the fly - wherever the wind takes us....     It's odd how one thing tends to lead to another for us, but was much needed.  Besides my tiring seven day a week work schedule, we recently lost our fourteen year old golden retriever, Roxy.   The first dog either of us have ever had, and a pure sweetheart, it's been so hard without her lately.  

Poughkeepsie Bridge 
After spending the morning with my mother-in-law, a quick look at my too trusty iPhone map for a quick way to the highway home, I realized we were a 5 minute drive from the Teatown Nature Preserve.  Lacking any sort of coordination, dexterity, and skill needed for sports, but having a mother who wanted me to do something other than sit home while my peers were at sporting practice, I spent many of my saturdays of my childhood at Teatown, hiking, helping out, grafting plants in the greenhouse,  learning to make soap, baskets, honey, dandelion salad,..etc.. with the coolest group of mostly hippie adults that I've ever met.  Formerly the country estate of the CEO of GE, the base of operations was the old Carriage house.  Setting foot there for the first time in probably 32 years, everything was surprisingly familiar down to the smell of the land.   The hippie tree huggers are mostly gone and being located in the heart of the most affluent area of mostly affluent Westchester County, New York, the emphasis has shifted a bit toward heavy duty fundraising and of course bland children's programs, but it's still Teatown.  I asked when they removed the bee hive in the wall - a massive glass fronted honey bee hive that I'm guessing was at least 8' across.  They said they didn't remove it and directed me to another room in the remodeled nature center - a much abbreviated 2x2 new glass hive - at least they still have one I guess.   I always thought the awesome thing about Teatown in the 1970s was that they didn't differentiate between children's and adult classes - all were open to any age.   Despite my pre-teen age, I always felt treated like an adult there, probably my first experience with this.  
Ties on fire after train passed in 1974.  Penn Central hadn't maintained the fire suppression system and there was no water to extinguish the blaze, and they had laid off the watchman, responsible for watching for fires.   Conrail inherited the damaged bridge and, while still under government control, convinced a convicted felon to create a bs corporation that they could sell the bridge to for $1
Walking around Teatown generated an appetite - I figured we were only a 20 minute drive from Cold Spring New York - a quaint little town on the east side of the Hudson River, slightly north from West Point.   The town is full of antique stores.  We had lunch outside at the former New York Central Hudson Line station.  Two Metro North Trains and an Amtrak passed while eating.  Cold Spring was the site of the West Point Foundry - a major industrial operation from before the Civil War, onward.  There were several blast furnaces on site and numerous foundry and machine shop buildings.   The foundry is famous for their heavy guns and cannons - Dahlgrens, Rodmans, and most important, the Parrott Rifle.  They also were an early builder of steam engines, locomotives, sugar mills, and all sorts of machinery.    In my early 20's my brother and myself spent time exploring the abandoned iron mines of Putnam County - the nearby Sunk and Denny Mines supplied ore to the the West Point Foundry's blast furnaces.  A mid-1800's railroad bed used to transport the ore out of the mountains is part of the Appalachian Trail.  
It's a long bridge -  the only reason it is empty is that they had closed it temporally due to a passing thunderstorm - being 214' high on a steel bridge isn't the best place to be I guess.  We waited out the storm under a pavilion on the west end - they had just reopened the bridge and we were in front.    20 minutes later there were at least 200 people on the bridge.  

While walking around Cold Spring I picked up a pamphlet that talked about the "Walkway over the Hudson", about 30 minutes north in Poughkeepsie, NY.   I'd been slightly involved as the President of the New York/New Jersey chapter of the Society for Industrial Archeology in the late 90s with this project - the conversion of the former New Haven Railroad Bridge into a pedestrian walkway.    It was finally completed in 2009 and has been on my bucket list since then.   As you can see from the photo, this is a massive bridge - over 200 feet high and a mile and a half long.  It carried the New Haven to Maybrook where it connected with the Erie, Lehigh and New England, and Lehigh and Hudson River.   It was the furthest southern railroad bridge over the the Hudson, as all freight south in New York City was moved via car floats.    Besides the beautiful Hudson River Valley panoramic views from 200 feet above the river, you can rail fan the former New York Central Hudson Division on the east side of the river and the West Shore on the west side.     This bridge is worth a visit - you can park on either the eastern or western approaches and walk the bridge.  Ironically, the city of Poughkeepsie, which is directly under the bridge, has no direct access - an elevator is almost complete and should be opened soon - the elevator would put the bridge within walking access from the Metro North Railroad Station.  The walkway is now part of the New York State Park system - it's newest state park.  The early volunteers involved in promoting this walkway met with a lot of skepticism with how many people would actually want to walk across this bridge - in it's first year open,  750,000 people walked the bridge - triple the projected 250,000
West Shore - Freight Only - Very busy line
Hudson Line - Metro North push-pull trains tied up at Poughkeepsie Station


Sunday, March 30, 2014

BOOK BUY WEEKEND

I was able to take a much needed break from work this weekend, starting off with a Friday night ops session at Rick Bickmore's HARSCO layout.  Always a fun layout to run trains on and the steel mill theme throughout makes it even better.  Rick has been busy lately finishing and detailing the Capitol Street area of his layout.  You can find photos of his layout and his latest work on the railroad-line forums site - go to the forums, and then layout construction thread - his is HTRR - Chapter 2  

A rainy lazy Saturday called for a run up to New Brunswick for Fat Cats and Thomas Sweets Blend-ins.   We of course had to stop at the Model Railroad Shop in Dunellen.   I picked up some Rix Tank kits for an upcoming gas washer project for B-furnace, along with some resin Buckeye trucks, som Easter Car Works gondola cover kits, and a book - Lehigh Valley Railroad - A Select Look at Locations & Facilities New York Harbor Region, by Benjamin L. Bernhart.    This book had some very interesting black and white photos of the LV RR port facilities in NY Harbor.  Of special interest to me were the Perth Amboy coal docks and piers.  Although Perth Amboy was the original eastern terminus of there railroad, it became sort of a secondary facility after there move into Jersey City at the end of the 1800's.   It's rarely covered in books so the in depth coverage was nice.   The book also explored  their various smaller facilities in Manhattan and the Bronx, with good photos and drawings  of their Bronx freight terminal.    Finally, the Claremont Terminal is featured, and for steel mill folks, one of the few tidewater Huletts in operation.   There was some B.S. going around the steel mill yahoo group about 6 years ago or so to the effect that Huletts couldn't operate in tidewater environs??  Because of the 4 foot tide I guess, like that would have made a whole lot of difference?  Well they did - at least two in New York - one on Lehigh Valley piers and the other used in unloading garbage barges elsewhere in the NYC proper.  (Huletts were also used in the Arizona desert at a copper smelter for cleaning sludge ponds - and I'm sure other places other than the Great Lakes)    I'd seen several photos of this machine before in Jersey City.  Used for unloading Bethlehem Steel South American ore, an interesting tidbit in this book - Bethlehem actually owned the Hulett at Jersey City, but it was operated by the railroad.   There was a second ore unloader, but of the Mead-Morrison type.  The text alluded that the Mead-Morrison unloader was needed for tramp steamers where there were restricted openings that the Hulett couldn't work in.  Actually it looks like the Hulett buckets were narrower than the Mead-Morrison, however, my guess is that it had to do with the overhead rigging and booms on tramp steamers.  The Hulett required more vertical space for their articulating arms.  But who really knows - this is the bottom line with much information out there on-line and in books - it's guesses by "experts" but no one really knows since anyone that was around while these machines were operating in Jersey City are probably dead and gone.  This book is well worth the $30 price tag to any Lehigh Vally or rail marine buffs.

We took the back road home through Princeton, stopping at Labyrinth Books.  They alway have great mark downs.  I picked up a Dover Architecture book of large city buildings with great drawings marked down to $7 from $30    Of more interest was The Roebling Legacy by Clifford W. Zink.  This was a book that I'd been meaning to get for some time but couldn't resist for 50% off - $25   This large hardbound book is a complete history of Roebling - the men and women, the bridges, the mills, and the mill town of Roebling.  Of course I was interested mostly in the mills in Trenton and Roebling New Jersey.  Well written book with plenty of interesting photos and history.  Some real neat shots of railroad loads from the Trenton and Roebling plants.

Finally, not really a weekend book - one that I ordered a week or so ago.  Ghost Rails IX, State Line Legends, by Wayne A. Cole.   You probably read my rave review of Ghost Rails X - wanting more, it seemed that this volume had more steel mill info in it.  It had some of Sharon Steel and Crucible Steel but not as prevalent as in Volume X.  No matter, still well worth the money.  Although I might come off as focused on steel mills, I am interested in all industries.   This book is chock full of a variety of extraction, chemical, and other industries.  Good information, and more importantly drawings, maps, and photos, of their operations, and just like Volume X, from the perspective of railroad operations.   Many of the industries are, in effect, steel related - limestone mining - extraction industries - even explosives that are used in extracting coal and ore for steel production.  Mr Cole has another volume, I forget which one, that covered the large USS centralized sinter plant that I will be ordering later tonight.    He also promises more volumes in the future with steel mill themes.   Well done again.

Sunday, March 23, 2014

Atlas H660

I've wanted one of these Atlas H660's for some time.  I finally picked one up this saturday at the local train store.  I bought the non-sound version, only because there were none available.  I will probably keep the Lackawanna scheme and concoct some story about the Perth Amboy Terminal needing extra motive power and leasing it.    This locomotive runs smoothly and has good slow speed operating characteristics.   I've never been let down with an Atlas locomotive and I try to stick to purchasing them, unless there is an unique loco that I want in another brand.  Protos run nicely generally, but I have had all sorts of mechanical problems with them over the years.  

Friday, March 21, 2014

OLD TRAINS MAGAZINES

I found a bunch of older Trains magazines at a local antique shop last weekend.   I bought about 11 or so, all dating from the late 1940's to the late 1950's.   Although all the photography is black and white, I found these magazines to be super interesting.  They span the steam to diesel transition era which I model.  There are many ads by a variety of railroads and the news items are neat.   With the dieselization of American railroads the competition  between manufacturers  of these locomotives was at it's height.    The boys from the New York Ontario and Western might have been a bit optimistic about a buyer coming forward for their railroad.


One of the 1959 magazines profiled the Union Transportation Railroad, a little know farm line, and subsidiary of the PRR, just a dozen or so miles from my house.  This little line became famous as the last holdout of PRR steam around the time of this magazine.   Besides the usual rural farm traffic, the line served Fort Dix/McGuire Air Force Base.  The photo that I'm showing here was titled, Paradox.   The paradox being the flat car load behind the steam engine - a launch rail for a CIM-10 Bomarc long range surface to air missile.  These supersonic ram-jet missiles were part of a late 1950's, early 60's state-of-the-art air defense system.  They carried a 10 kiloton plutonium warhead, detonated in proximity to a Soviet bomber stream - like fishing with dynamite.   The installation at McGuire was the first operational in the United States and many of the materials to build it were transported by this little steam powered railroad.

A side note - the McGuire Bomarc launch facility would be the site of a significant cold-war accident less than a year after this photo was taken.  A fuel tank on one of the Bomarcs exploded and the fire melted the plutonium warhead (without detonating the explosive initiator - some first rate engineering)  contaminating the site with weapons grade plutonium.   With the Cold War at full speed, the launch shelter was quickly encased in concrete and the remainder of the installation (55 missiles) was kept operational.   In another railroad connection, the site was finally cleaned up between 2002-2004 and contaminated soil was shipped out via the former CNJ Southern Division line.

Unrelated - the complete ST&D hot metal car as built from kit.  To be detailed further,....


Friday, March 14, 2014

STATE TOOL AND DIE 200 Ton Hot Metal Car - Part 1

This new release from State Tool and Die came out last fall.  I finally got around to ordering one.   Initially the bottle part of the car had a double taper.  After my experience on my scratch built four truck car, I immediately understood why this was done - wheel clearance.   If you remember with my car, I'd followed Treadwell plans online, exactly as possible.  Only after I saw the notation of 28" wheels on the drawing did I figure out the standard 33" wheels I was using were the problem.   So in using standard trucks, ST&D must have run into a similar problem.   After being taken to task online about no prototype, they reengineered the car with a single taper.   The new version says, "Revised" on the packaging.  From what I understand they will send you new ends if you have one of the original cars.

The kit was $50, and is packaged in the standard ST&D baggy.   The parts are the usual heavy grey plastic.   They are nicely molded and not much flash to clean up.  The instructions are easy to read and the fit of the parts is good.   The turning equipment on the one platform is fairly plain and consists of three separate pieces.  There are no registration marks so you might want to just place everything first so the final assembly makes sense.  

The only parts I didn't use are the thin square sheets that fit around the spout.  I've seen this type of thing on more modern photos of prototype cars, but not back in the 50's.    I also didn't use the steel weight provided for inside the bottle.  I will just use lead birdshot until I like the weight.    The kit is basic in that there is no brake equipment, hand rails, grabs, steps,..etc.   I will be adding these.  Also, I'm considering backdating the car a bit to riveted construction - stay tuned.

I'll end with a poor quality photo I took driving across the Walt Whitman Bridge into Philly of a rail transfer yard in Camden on the former property of New York Shipbuilding.   It's used for loading a variety of imported cargo onto railcars.  Lately they have been bringing in steel slabs by ship, from I don't know where, and loading them into gons, destined for AK Steel (Kentucky?)  I'm thinking possibly from Brazil?    The slabs are shipped out in unit Extras.   If you look closely you can see the diagonal siding that the crane straddles and slabs laid out for loading along the track, in addition to the stacks in the middle of the photo.   Rail traffic has been booming here in south Jersey - first the oil trains, and now coal and slab trains.

Thursday, March 6, 2014

BOOK REVIEW - Pennsylvania Short Lines Volume 2


After my recent purchase of Volume One of this Morning Sun book, which, organized in alphabetical order, left off at the Ma and Pa, finding Volume Two of this out of print book became a priority.  There were several for sale online.  It's hard comparing these two, as they are both excellent, maybe this one was slightly better from a steel standpoint.   The subtitle for these books is "Traditional Shortlines of Pennsylvania Extant in the 1950's"    This is an important differentiation in that the shorelines the book covers existed to primarily serve a specific industry, or isolated mine or town, and connect with a mainline railroad, as opposed to the more modern versions of shorelines, many formed to operate lines abandoned by main line railroads.    Modeling the steel industry in the 1950's is tough from a color standpoint as most of the resources are black and white.  The color images in these Morning Sun books are especially useful in terms of colors of industry, rolling stock, and roadbed.   This book, like the first Volume is chock full of steel industry images from the 1950's and 60's.   Some of the steel mill shorelines covered are -

McKeesport Connecting Railroad -  National Tube
Monessen Southwester Railway  -  Pittsburgh Steel
Monongahela Connecting RR -  J&L Steel
Philadelphia, Bethlehem and New England RR -  Bethlehem Steel
Pittsburgh & Ohio Valley RR - Shenango Inc
Pittsburgh, Chartiers & Youghiogheny RR - also Shenango Inc
Steelton & Highspire RR - Bethlehem Steel (Steelton plant)
Upper Merion & Plymouth RR - Alan Wood Steel

There are lots of photos of the steel plants and steel specific equipment, in addition to revenue cars with interesting steel related roads.    Some interesting initial observations -

The blast furnace complex at Bethlehem Steel in Steelton was mostly painted a silver color - not the usual black or iron ore/primer red color.  I'm starting to think that the Bethlehem plant at Lehigh, which I am modeling Blast Furnace A, had the same coloration in the 50's.   The peeling paint on A-Furnace, which is still standing, looks silvery to me.  I brought this up on the Yahoo Steel Group about five or six years ago and I was told no way, that it was just a black coating and always had been.

Blast furnaces at all the mills listed above are depicted whole or partially in this Volume.

Some neat shots of those unique Pugh torpedo hot metal cars used at Alan Wood Steel

Ladles used at Shenango, not torpedo cars - a few shots of these

An interesting car load at Bethlehem - a gantry crane being shipped from Bethlehem to another mill.

Well worth the money.

Saturday, March 1, 2014

BOOK REVIEW - WESTERN NEW YORK STEEL

This is a new release by Arcadia Press - Western New York Steel - It is an excellent, and very economical book related to the steel industry in the Buffalo, New York area.  The majority of the photos in the book are of Bethlehem Steel's Lackawanna Plant, however, it also covers Republic, Towanda, and a number of other smaller operations.   The photos are numerous and very interesting.  As with all Arcadia books, all the photos are black and white, and are generally smaller due to the format of these books.  There is an excellent historical overview that accompanies the photos, but these are picture books so most of the information is gleamed from the captions.    I visited this area in college during the late 80's, just after most of the Lackawanna Plant was torn down.  I spent some time at the local historical society and their seemed to be a number of people interested in the steel history of the area.  Apparently there is now a steel museum up there that I would like to visit someday.  I'd wished I'd spent more time back then looking for steel industrial archeology, but from what I remember, I was focused on photographing the many grain elevators along the waterfront, many of which were going to be torn down.   Well done - if you are interested at all in steel or steel modeling, buying this book is a no-brainer.  You can order online from the Arcadia site - I think it was less than $25 with shipping and arrived in two or three days time.