Sunday, December 19, 2021

PROTO 48 LAYOUT #1 - So long Leroy Jenkins…

So begins my newest diversion into the world of Proto 48. For those unfamilar, Proto 48 is a modeling subset, of the already small O Scale 2 rail modeling population. Eons ago, when people began modeling in O Scale 2 rail, manufacturers decided it would be simpler to just make O scale mechanisms, and rail, an easy to remember 1 1/4". In 1/48th scale, this of course, is 5', not the prototypical 4' 8 1/2". So you wonder, what does this 3 1/2" difference look like in O-1/48th Scale - 0.073 inches. Not a whole lot visually, but honestly, regular O Scale 2 rail track does look a little wide, if you have been looking at railroad track for years, like me. Besides correcting this rail spacing issue, Proto 48 also addresses flange and wheel profiles, and other prototype fidelity issues, but maybe more on that in future posts. You have to be a bit of a masocist to delve into Proto 48. There is little out there in way of commercial products, and 99.9% of the O Scale locomotives produced, didn't offer a Proto 48 option. So, just to get some motive power, you are looking at reworking the wheelsets, axles, electrical pickups,...etc. And then you will have to adjust the truck sideframes. Freight and passenger trucks also will need to be reworked with new wheelsets and bolsters to readjust the sideframe spacing. In the truck department, there are commericially available Proto 48 versions of most of the popular designs. They are nicely detailed and made, but also cost in the $50-65 range for a pair. Again, there will be more on the motive power and truck rebuilding in future posts. If I was building a basement sized layout, there is no way I would go Proto 48 - I don't have enough years left, or money to do so. But, since my layout will be a simple 18"x20' shelf, with a minimal number of turnouts, and only large enough to hold a single locomotive and maybe a half dozen-dozen cars, I'm giving it a shot. The layout, though operational, will be built as more of a diorama. I intend the trackwork to be as detailed as the freight cars and factories.
It starts with a bad sketch and lots of erasing

Who is this Leroy Jenkins fellow? If you are asking that, odds are, you are older than 35. Leroy Jenkins was an online gamer that gained popularity maybe 15 years or so ago. Leroy was part of a team playing the World of Warcraft online. They had stopped their characters at a door to a game environment that was particularly difficult, and that had defeated them before. They spent a good five to ten minutes formulating a complex strategy to prevail, whenwhile, and unknown to the team, Leroy had went to his kitchen to make chicken fingers, and when he sat back down at his computer, he screamed his name, and just ran through the door. What follows is a comedic nerd meltdown by his unprepared teammates, and fairly quick deaths of most of the team. You can probably find the original video on Youtube. My layout design process from my teens, upto my present age of 55, has been "Leroy Jenkins" - just go in guns blazing and figure it out later. This of course, has let to many renovations and reworks of my HO layout, although overall, it isn't a totally bad thing, since I've been modeling a 1950s integrated steel mill with roots pre-1900. These mills, like Bethlehem home plant, or Johnstown, had tight footprints, and upgrades to the mill would be typically complex and a bit disorganized. This time, I wanted to actually refine a plan, before I started laying track.
 
TREMLEY POINT LAYOUT - Initial CAD plan

I started with a sketch - pencil on paper.  I’m not that creative, and have appropriated sections of the former Glover Road HO layout, featured in the Boomer Dioramas YouTube channel; and the O Scale Cleveland Flats shelf layout.    After the sketch was tweaked a few times, and I was in the ballpark, I moved to CAD on the computer.  This is a bit complicated, and not something that readers will be able to access readily.   The initial drawing was done on a program called V-Carve Pro, by VETRIC.   It’s a CAD/CAM program, primarily used by people working with CNC machines or Laser Cutters.  After getting all the basic lines in V-Carve, I export the drawing as a 2d vector file and then import it into Corel Draw.  It would be easier to just do it all in Corel, but the bottom line is I’m just not proficient enough with it, compared to V-Carve.  I also find V-Carve to be more of a linear, geometric, mechanical drawing type arrangement, where as Corel is more about creating art.  Corel is useful for this process in adding scenery and structures to the plan, and also, for printing.  (I am unable to print well out of V Carve) 

The full sized layout printout

Speaking of printing -   The layout is drawn in full scale, ie.  1” on the drawing is 1” on the layout.   So this drawing is 18” wide by 248” long.  Fortunately I have an ink jet printer that takes 24” wide rolls of paper, and I was able to print the entire layout out on one sheet of paper.   The layout benchwork perimeter was cut out by scissors and I was able to place the entire plan on the benchwork.  This allows me to see how it looks; check clearances; identify problems; whatever.  I will use this CAD drawing for cutting the bench top, foam, and road bed.   If you are scratchbuilding cars, or structures, or whole layouts in O Scale, or HO for that matter, having one of these printers is helpful.  They are cheaper than you are probably thinking - mine was around $600, and the paper is cheap, and ink jet cartridges are reasonable.   Yes, it has a built in cutter that trims the sheet.   It cuts wherever the printing ends, so in a way, conserves paper.
Test fitting on benchwork - adding a printout of a #6 turnout


Next post - the prototype environment I’m modeling


Saturday, November 13, 2021

I CAN’T BELIEVE IT’S BEEN ANOTHER YEAR…..


The three cars in the foreground are all O Scale scratchbuilding projects .  Erie DUNMORE caboose, Penn Central G-38 ore jennie, followed by a G-39.   The cars are constructed of a mix of acrylic, styrene, brass, Polybacker, and 3d resin printed brake gear.  

I’d like to say “time flies when you are having fun”, but the “fun” has been mixed with a difficult year since my last post, incredibly slightly over one year ago.  Despite plenty of available work, navigating a business in the world of Covid, ever increasing commodity prices, and a politically divisive environment has been challenging.   With the vaccination available, the election over, and the weather starting to warm, it seemed like the worst was over, and then we had the resurgence thanks to the Delta variant, and since June, I’ve been having fun with multiple kidney stones.   While not a life-threatening condition, these bastards are painful as heck, and make it impossible to do virtually anything, when they are at their worst.  

At the O-Scale Club, we are under the rules and regulations of our landlord, the Grace Episcopal Church, but have been thankfully allowed to meet again for the past few months.   We had our first open house, since January of 2020, two weekends ago, with two more to come in December, and four in January.  Everyone over 2 years old, regardless of vaccination status, has to be masked in the building. The church received thousands of masks from either the state or US government,  which we are able to make available to the sizable percentage of folks that show up without them, despite our flyers and everywhere else clearly indicating the church’s policy.   So far no morons making a ruckus about this minor inconvenience.  We are also hosting the local NMRA Division meet in January.   We had almost 300 visitors at our first open house - in four hours.    We also just received a donation of a large railroad book collection that we will have out for sale beginning with our December open houses.   It’s a nice collection and includes the complete, six volume Central Vermont history.  If anyone is looking for that rare set, please let me know - we would probably accept a very favorable offer.

My O-Scale freight car scratchbuilding spree continues.  I have over thirty of the PRR/PC/CR  G38/39/39a  ore jennies under various stages of construction, with the ultimate goal of around 50.   Additionally, I am on my third Erie DUNMORE Caboose; mostly have completed six Georgia Pacific 60’ Thrall Pulpwood Racks; tank construction of four Seaboard whale belly Pneumatic Covered Hopper (they were technically tank cars); four liquid phosphate tank cars, per recent RMC plans; and a half dozen various tank cars, including a six axle Monsanto elemental phosphorous whale belly tank.   I will try to update with in-progress posts of these projects more often.   As many of these are being scratchbuilt using digital fabrication, I plan to make some or all available for purchase, as “parts kits”.  I don’t want to get into fancy packaging, or spending many hours writing, editing, and illustrating instructions, but do plan on posting YouTube videos of the construction process of each.  

I am also scratchbuilding an O-Scale ALCO C415 locomotive.  I’ll have more on this too, but suffice to say, the short hood, cab, frame, and power trucks are all complete.  Left are long hood, which is mostly designed in Fusion 360, and then all the railings, fuel tanks, and other details.  The railings are proving to be one of the harder items to work out.  

What about the HO Steel Mill Layout?  Well good new there, especially since this was originally a steel mill modeling blog.  The layout is cleared off of O Scale detritus, and I’ve been running trains on there for the past month, after around four years of dormancy.   I intend to get back working on the structures and layout soon.  Since this was last worked on, my improved digital fabrication equipment, should speed up the process.  The hardest thing for me right now, is what to start on.  

The reason the layout is no longer an O Scale storage shelf,  is the almost completion of my new 20’x8’ model shop - complete enough that I moved in to it.   This shop holds my primary workstation - a 20’x2’ workbench,  a new spray booth, my 3d printers, my laser cutter, my model and real railroad books, magazines, and other research files, some of my collection of railroad and other crap, and eventually, an O Scale, Proto 48 shelf layout.  
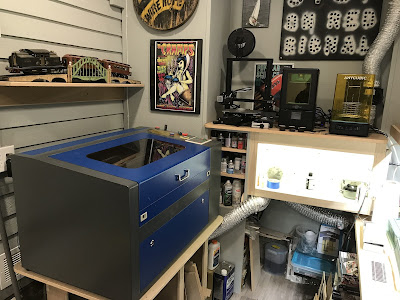
The digital fabrication corner - laser cutter, 3d resin and filament printers.  


The already messy new workbench.  


Sunday, November 8, 2020

BOOKS FROM ENGLAND

 For years, I’ve picked up the English model railroad magazine,  Narrow Gauge & Industrial Railway Modeling Review.    Despite mostly dealing with UK prototypes (occasional US prototypes) it is my favorite, and in my opinion, best modeling magazine out there.   Doug’s Trains in Claymont, Delaware, used to carry them, but haven’t for around 4 years.  I was told there that the publisher died and there was and interruption in publication, but since it’s been published again, Doug’s hasn’t been getting it.  This led me to miss out on a few years of issues (four a year).  I managed to fill in what I missed via eBay, but kept meaning to get around to paying for a subscription, which I did two weeks ago.   It’s 45 pounds a year to get in US - somewhere around $60 a year - still worth it for me.  

The first magazine came via air mail in less than 6 days from ordering it.  While I was ordering from them, I got the few back issues I didn’t have from past few years, and purchased two books - The Crowsnest Chronicles and WDLR Companion.   

The Crowsnest Chronicles is first-rate, and incredibly cheap - 10 pounds, around $13 US.  It’s a nice paper bound 96 page book, with 174 photographs and 25 drawings, diagrams, and plans.   The modeling is outstanding and something to aspire too, but better, the techniques and materials are explained.   It’s the author’s  ramblings of his construction of locomotives, buildings, cars, track, and scenery, for a series of narrow gauge dioramas from the early 1970s to the present, based on a fictional narrow gauge prototype.  It starts out in O scale but ends up in 16mm, which is a popular scale in England to model 2’, or 600mm narrow gauge prototypes.  It works out to around 1/19 scale but the track is pretty much O scale - in US would be like Gn2 or maybe Fn2.  

The second book WDLR Companion, was a bit more expensive, 32 pounds.  It’s about the Western Department Light Rail WWI trench railways.   The same publisher put out a book six years ago called the WDLR Album, which is out of print now.  This book is a companion and stand alone book, with photos, drawings, and interesting history.  Not something I will ever model, but WWI light railways have always been interesting to me.  Carstens, now White River, published Narrow Gauge to No-Mans Land, they might still have available, which is about the US light rail system in WWI.   The WDLR is the British system.  These railroads were operated in dangerous, harsh conditions to supply the front line, and move wounded to the rear.    As an aside, one of these 600mm trench railroad systems was relocated after the war to nearby Ft Dix, and used to transport troops to and from the ranges.   They have I believe a car in their museum still.  

Besides excellent writing and drawings, the quality and layout of these books are first rate.  

Saturday, November 7, 2020

BOOK REVIEW - West Floria Rails. Volume 3. Bone Valley Phosphate Operations


You know you’ve bought too many Morning Sun books, when you start looking at subjects far from home, west Florida to be exact.   In all fairness, I’d always been interested in the Bone Valley area, but there wasn’t really much out there about it.  For those not familiar, the Bone Valley is in central west Florida, and has the largest deposits of phosphate in the US  Phosphate is primarily used for agricultural fertilizer, but also other things, like giving soft drinks their unique tangy kick.  From a railroad/industrial standpoint, the area would be comparable to the coal regions of West Virginia or eastern PA - lots of trains, in a small area, pulling the same stuff.  The difference would be that the Bone Valley peaked in the 70’s and 80’s, in terms of output, so the locomotives and rolling stock are more modern.  The rolling stock is also very unique and interesting - a mix of open and covered hoppers, with a smattering of tank cars carrying acid.  The hopper cars are fairly specific to hauling phosphate.  

The book is nicely laid out, with good maps (something many Morning Sun books lack).   Excellent descriptions of the photos.  Subject matter not confined to solely locomotives.  Plenty of photos from afar, and also plenty without a locomotive.   Interesting subject, well described.  


Wednesday, October 21, 2020

WEATHERING CARS - STEP 1 FILTERS

I use my own cobbled together method for weathering freight cars.  Generally, it’s three steps - 4-5 coats of various filters,  oil washes and highlighting, and finally dry powders.    For filters I use Vallejo Air colors, thinned about 3 or 4 to 1 and applied with an air brush.   Generally I do 3-4 coats on body and then turn upside down and do two or so coats from under, spraying upward to simulate dust and dirt from the roadbed.    My go to is a medium grey for the car bodies, and a dark earth for under frames.   The photo shows identical cars, one with three coats of a grey filter, the other nothing.  It illustrates how well the filter fades the bright colors.  

Since I model the PC era, I take into consideration the dates on the cars, and the use of the car to determine how much or how little weathering.  


Wednesday, October 14, 2020

ERIE DUNMORE CABOOSE BUILD, CONTINUED


This is the Dunmore caboose in O-Scale, almost ready for the paint shop.  


This sandwich bag contains all the laser cut parts to build the above caboose.  Besides these, there are a few Evergreen structural shapes, some wire, and Grandtline AB brake gear.  

Tuesday, October 13, 2020

DIGITAL FABRICATION - G-39 and G-38 Ore Jennies continued.....


The first G-39 was completed a few weeks ago.  The photo above was from a test run on the Cherry Valley O-Scale layout.  The white car to the right is the prototype G-38.  The G-38 was the original PRR home built “modern era” Jennie.  1000 of the G-38s were built in the very early 1960s, soon followed by 2000 of the G-39s and G-39As.  Much of the two cars are identical, with the exception of the additional 18” of height on the G-39s, the absence of steam lance portholes, and the much larger, pusher bumpers.  The G-39 was built coincidentally with the emergence of taconite pelletized iron ore.  The 70 ton rating of the G-38s couldn’t be realized with the lighter taconite.  With the higher sides, the G-39 could carry the full 70 tons of ore.   In the Penn Central era I’m modeling in O-Scale, the ore trains were a mixture of both versions of the car.  I hadn’t originally intended to model the G38s, but for prototype fidelity, I changed my mind.  Some of the laser cut files need to be adjusted and parts added or eliminated, but overall, much of the work had already been done, and the assembly was similar.   The first G-38 is complete, painted, and partially weathered.  I need to do some final weathering with oil paints and chalks and it will be good to go.  At this time, I have about 24 G-38s and 39s under various stages of construction.  The ultimate goal is around 45-50.    Again, the laser cut parts, the laser drilled holes, and the laser alignment marks, makes assembly easy and fun.    I have a number of other O-Scale projects of similar nature underway - an Erie Dunmore Caboose, a 60’ tank car, an 85’ TTX piggyback flat, and a Seaboard Pneumatic whale belly covered hopper.   I’ll be posting about these occasionally, under the Digital Fabrication heading.   All these cars are being built from scratch, with the intention of production of multiple cars, using digital fabrication to speed, simplify, and add precision to their construction.   They are being built of a variety of materials, primarily plastics, and using a CNC router, a laser cutter, and multiple 3D printers.