Sunday, July 27, 2014

SPRAY PAINT, STORAGE, AND ELECTRICAL POLES

Once again I haven't had the time to follow up with additional posts related to my new cutting machine.  Hopefully I'll start to assemble the gas washer I started a few weeks ago,  very soon.  In the meantime......

SPRAY PAINT -  This is a Liquitex can of spray paint I picked up the other evening.   It's the first that I'm using this product line.  I've used liquitex acrylic paints for years and like them.  The spray paint is low odor and while wet can be cleaned up with water.   There are a fair number of online reviews relating to the tips clogging.  This is common with water based sprays I've noticed.   I use a Zinzer water based spray primer and it behaves similarly - clogged tips and sputters if you don't keep the tip clear.    As I use these paints,  I guess I'll figure out how much of a pain in the ass this becomes.   What I do like, is the range of colors, and not typical bright pastel colors, but lots of earth tones and industrial looking colors.  The cans are 12oz, which is four times as much paint as the Testors or Floquil cans.   The price varies, but figure on around $6, which is slightly more than the Lowes/Home Depot Rustoleum or Kyrlon Cans.   I managed to pick up two on sale at Michaels at $5 a can to try.   I bought an industrial light green color that I might use on my port crane, and Raw Umber #7  - This second color is the best I've seen to approximate weathered concrete.  I do also like the Rust o leum light brown camouflage color for this as you've seen in the past, but I think this is slightly better as it's a touch lighter.    You can go online to Blik Art supply and check out there range of colors.

One pass made for rabbets - awaiting second pass

STORAGE -  With the limited space I have in my basement, my scratch building supplies and parts are scattered in many plastic bins and boxes.  I want to get a more organized system as the one part I usually need is the only one I can't find.  Taking a page from the old drawer/bins found in general stores and hardware stores I experimented at my shop with developing a system of mass producing sturdy and cheap storage bins.  I'm using 1/2" MDF for the entire drawer and they are roughly 6"x6"x12",  but really any size could be made.  I want to be able to create some simple plywood shelves that these bins will fit into.    MDF is super cheap, but I also wanted to not spend a lot of time on these things.   The fewer machines and operations the better -  All the cuts were made on a table saw with a regular blade.  The only other tool needed was a brad or pin nailer to assemble the drawers (the glue really holds them together.   The fronts have a notch, or in woodworking as it's known, a rabbet, on three sides, and the sides have rabbets on the two long sides.  The bottom has none.   If measured correctly, the pieces will fit together nice and tight, with the glue doing the real work, and the brads just to hold things together while the glue is drying.   I fashioned some cheap simple handles from poplar using a few passes on the table saw.  Hopefully the pictures tell the story, but if you need more info just drop me a line.
The five pieces of a bin/drawer

Assembled - these 8 took about 2 hours from raw MDF to built
Cheap easy handles.  I might use the handles typical on the old library card catalogs as they have a slot for a label.  


Getting late so I'll cover the Electrical Poles in detail in a future post.  Briefly I wanted a look that you see in a lot of steel mills - tall narrow towers as opposed to your typical hi-tension poles.  The BCH towers fit the bill, however, they were slightly short I felt.  I added a short section from the Walthers electric tower kit to the bottom of the BCH tower and then added a concrete foundation.  Still playing around with the design a bit but here are some preliminary results -


Sunday, July 20, 2014

STEEL FINDS

While antique shopping last weekend I came across these two wire rope artifacts and purchased them.  One was a full spool and the Bethlehem one, just a half.   Also note the Penn Central timetable from 1970.  It was a few bucks but interesting reading - good info on trains and also on industrial sidings along routes.  Posted track speed limits were a crawl in many places - too young to remember but physical plant sounds a mess.


I also picked up a few other time tables for $1 a piece - a couple PRSLs from the 50s of local interest and a ACL very nicely done booklet - last station stop Havana.   While at the Reading RR Historical Museum (photos of equipment in earlier blog), I picked up some back issues of there magazine - the Bee Line.  Specifically I picked up the very well done issues (3 part) on Bethlehem Steel's Grace Mine and another nicely done article on the massive railroad tie creosoting plant at Port Reading, NJ

A few models here and there.   At a visit to a Robot museum/store I grabbed a model of the robot from the 70's (I think) TV show Lost in Space.  Also elsewhere, a 1/144 scale Dragon model of a WWII German Railway gun - nice brass etched detail parts and a turned aluminum barrel.   Nice mix of reading materials, trains and models, and industrial artifacts.

Saturday, July 12, 2014

NARROW GAUGE

Plymouth critter     Supposedly from Carpenter Steel in Reading Pa

ALCO. C-630

Last surviving ALCO C-630.     Hamburg, PA

Monday, July 7, 2014

HO MODELING WITH THE SILHOUETTE CAMEO - Part 3

Really getting back on the blogging wagon so to speak.  Partially as I'm excited about the Cameo and the potential to assist in making precise parts.  I'm a bit nuts about precision and nothing ruins my day more than having one component slightly off and messing up the whole structure - maybe not ruining it - but something that will bug me every time I look at it.   I did some intricate stuff with the roof truss cutout in Part 2, however, I really see me using it more for basic parts for structures.  I figured a good place to start is the gas washer complex for B-Furnace.   It's a rare mostly free-lanced structure for me - I'm using some measurements of similar washers from HAER drawings, but using photos I took at Bethlehem Steel last year from the deck of the arts center of the washers for either their B or C furnace.   To refresh memories, B Furnace as a dust catcher modeled on a prototype formerly at Central Furnaces in Cleveland (most of Blast Furnace B is based on that prototype, except for the furnace stack itself which is partially based on USS Duquesne #3 furnace) .   There is no precipitator in this complex as both furnaces share a dual precipitator plant modeled almost exactly on the prototype at Bethlehem A furnace and located behind that furnace on my layout.   The washer plant has two main wash towers and two downcomer pipes with additional water sprays in them.   There are multiple platforms on all four towers.  Getting the platforms to match is always tricky and my previous method was to create one and then use that as the template.   This time with the Cameo, I started by drawing the base plate in Silhouette Studio.  I then copied this drawing to use as the basis for all the platforms.  Since everything should be in exactly the same place, I'm hoping the pieces will naturally align the towers and maintain the same spacing throughout.
Initial drawing

In addition to the base and the platforms I created the caps for the upper part of the washers, many platform supports (very small pieces) and rings for some sort of donut ring of undetermined function near the base of the down comers.    I fit the whole thing on a single 12x12 sheet, the max the Cameo can handle.    I started the cut using a sheet of .030.   If I haven't mentioned it before the Cameo uses a cutting sheet - its a 12x12 tacky piece of acetate with a grid that matches the drawing screen.  The sticky nature of the sheet is good when cutting thin plastic and paper and card stock as it holds the pieces in place that are complete cutouts - without it these would fall off and get jammed in machine or even shifted and then cut again.  With .030 and .040 plastic I've omitted using the cutting mat as the machine doesn't cut through the thick styrene so no worries.  I also am feeding in media that is probably a little thicker than the machine is built for so not having the mat keeps the thickness down.
Smaller drawings - less components

For whatever reason, the plastic shifted and the cut shifted out of whack halfway through.  It also had trouble with the cuts close to the edges and with the knife running off the end of the styrene and not being able to get back on.  So I broke the components down into 4 separate files and am cutting them one at a time using 9x9 sheets of plastic.  I reduced the cut window to 6x6, but I wanted some extra room on the plastic to prevent run-off.   Also, the feed roller can only be moved in to about 8" so there would be a feed problem with smaller plastic, however, you can feed smaller pieces of material in using the mat, just not the thick styrene
Cracks and seams added to drawing of base

I thought about it and went back to the base drawing and added concrete pad seams and also cracks.  The cracking was done using the freehand draw function.
Gas Washer base - used some pencil graphite to emphasize the concrete seams and cracks .  Also notice the platform supports - broken off and a strip behind of additional pieces.

I cut out the base on .040 styrene and no problems occurred during the cutting with the 9x9 piece.
Base with towers dry fitted 

The circles on the baseplate basically mark the exact locations of where to glue the towers.


Saturday, July 5, 2014

HO MODELING WITH THE SILHOUETTE CAMEO - Part 2

I was able to pick up a variety of plastic in the larger format Evergreen sizes (12x24)    Cut in half they fit in the Cameo perfectly.     I altered the roof truss file shown in part one.  I decreased the size just a little to fit the real estate on the model railroad that I've staked out.  Easy to do and it was described yesterday under the Scale function.  I also duplicated the entire truss to cut out three per sheet.  There is a Duplicate function - learn to use it as it makes things go quick.    Most of my next file I will describe was done using Duplicate.    I also added cross bracing for the sides of the buildings.  I did draw this, and then duplicated into two.  I found it easier to draw this x bracing if I drew a rectangle/square first and used that as a guide for placing my lines.  I later erased the rectangle along with my overlap lines.   Actually leaving the rectangle might make it easier to break the pieces out.  
The revised cut file - additional trusses and cross bracing

I put a sheet of .015 in the Cameo and let it do it's thing.  I wasn't looking at the time exactly but I'm guessing the cut took about 20 minutes.   I set the blade all the way down and set the machine to double cut.  Even with this, the pieces still had to be bent and broken out a little.
Cut sheet of .015 styrene

Once the parts were separated, I used .030x.060 strip styrene to laminate to the truss frames to create an angle steel look.  It is still tedious - I cut and fit each piece and it took about 20-25 minutes to make up one truss.  If I set up for mass production and pre cut all the members it would go much faster.   One side received the strip on all members.  The piece still felt a little flimsy so I added additional strip on the opposite side, but only on the primary structural pieces.   It's still work, but I'm happy with the results and more importantly, the trusses will maintain a consistency that will help keep the entire structure neat and proportioned.   They look a little finer and much better than what I've done in the past with jigs.   I still have many buildings to construct so I'm sure I will be building lots of these.   I will probably go back and do the trusses of the stalled soaking pit building using this method.
Cut out, ready for assembly

For the cross bracing, I used .030x.125 strip between the pieces.  This packs the bracing out to fit nicely between the web of  1/4" H columns .
Final products

My next experiment is using the machine to score thicker, .030 plastic for the gas washer plant for B-Furnace.  I'm basing the structure on photos and some HAER drawings but it's free lanced.  The dimensions are fairly accurate I believe.  


Friday, July 4, 2014

HO MODELING WITH THE SILHOUETTE CAMEO - Part 1

Well a day off.  Virtually no excuse to work today except on some paperwork.   We did go look at a house today - perfect set up - three landscaped acres, nice house, three car garage with finished second floor, in-ground pool, short sale so could get for $100k below market value,  etc.   Then I opened up the Bilco door to the basement -  CRAWLSPACE - ugh.

The raw material....

I finally had some time to play around with the Silhouette Cameo a little today.   As I mentioned in the previous  blog entry, I intended to try out cutting a roof truss for large industrial buildings.  The Cameo cutting area is 12"x12" so you could do almost any truss for an industrial building, and could maybe even layout diagonally if you needed an inch or two more.   My original plan was to draw this in the free drawing program that Silhouette puts out -  
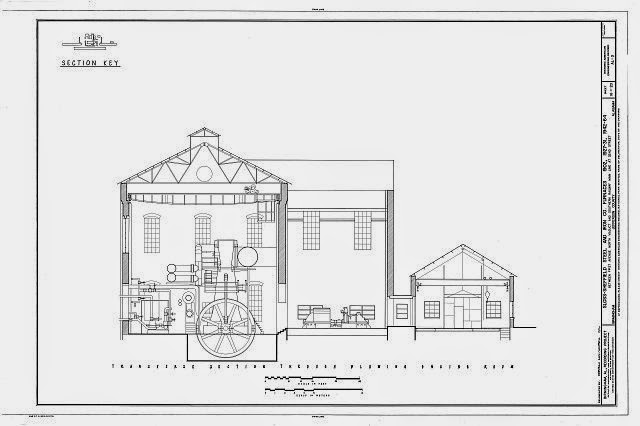
Silhouette Studio v.3,  however,  after some playing around with the Trace feature of the program, I tried using an existing graphic as the basis to make things a bit easier.   A quick search of HAER documentations I quickly picked the above drawing of the Sloss Furnace blowing engine house.   I downloaded the highest resolution TIFF drawing and cropped the top portion of the drawing.   The truss on this building is about 72 feet wide - perfect for HO steel mill buildings.

The next step is to use the Merge function in Silhouette Studio to import this image.  This is the image merged onto the 12"x12" cutting mat background.
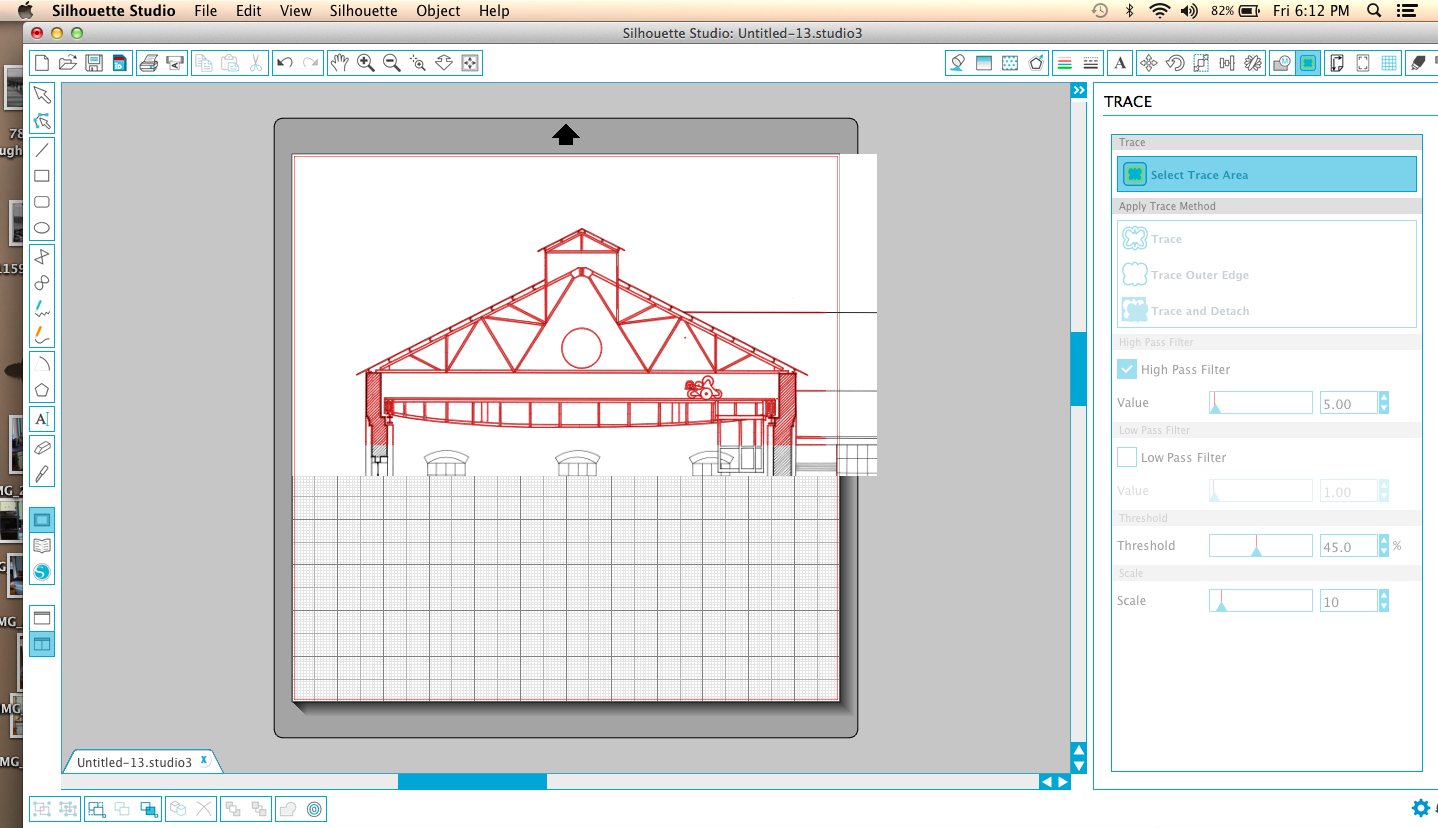
Trace Function

Now use the Trace function to "trace" the image.   The red lines are the actual cut lines that the machine would cut into your material.  The black lines of the original image wouldn't be cut, however, you could print out them first on your regular printer and then feed that print into the Cameo and it would cut along the red.  This would be useful in paper modeling, but you can't feed plastic into your printer.    It would be nice if it were this easy, but the trace function is imperfect.  There are filters and other variables to adjust the Trace function that might improve the result, but this was what seemed to work well.   Besides the walls and crane that I don't want to cut, if you zoom in, and you can zoom in quite a bit (something that is useful in cleaning up the cut image) you will see the computer literally traced all the lines - the truss members are two lines, but the red cut lines placed by the Trace function are on both sides of each line, so there are four cut lines - it literally traced the black lines as if they were images.  You need to clean up the drawing.  It's some work, but not as much as drawing from scratch.  There is an eraser tool which helps with a lot of the extra images but be careful within the lines themselves.  If you are using the erase tool it's best to zoom in all the way as you will have more precise control.    Easier yet, is to use the Select pointer tool to select lines and then click delete.   This method is faster and cleaner, however, you need to make sure what you select isn't attached to the larger image and deletes more than you want.  If you do, you can always use the Undo tool in the Edit menu to take a step (or five) back.   You will also find that you will need to fill in a few places with new lines.  Use the Line tool in basically a connect the dots fashion.  You can also adjust the lines if a little off by clicking on them with the select pointer and change the angle or length.    The idea is to make sure you have continuous cut lines all the way around so you won't have to cut your parts out.   Also, make sure to erase all intersecting lines so the part is all one piece.    One interesting problem is that the original Sloss drawings were hand drawn by a human (pre-CAD documentation) so when you zoom in, slight human errors in the lines become more pronounced.   I cleaned up a few but left others as these errors are relatively small and not noticeable.
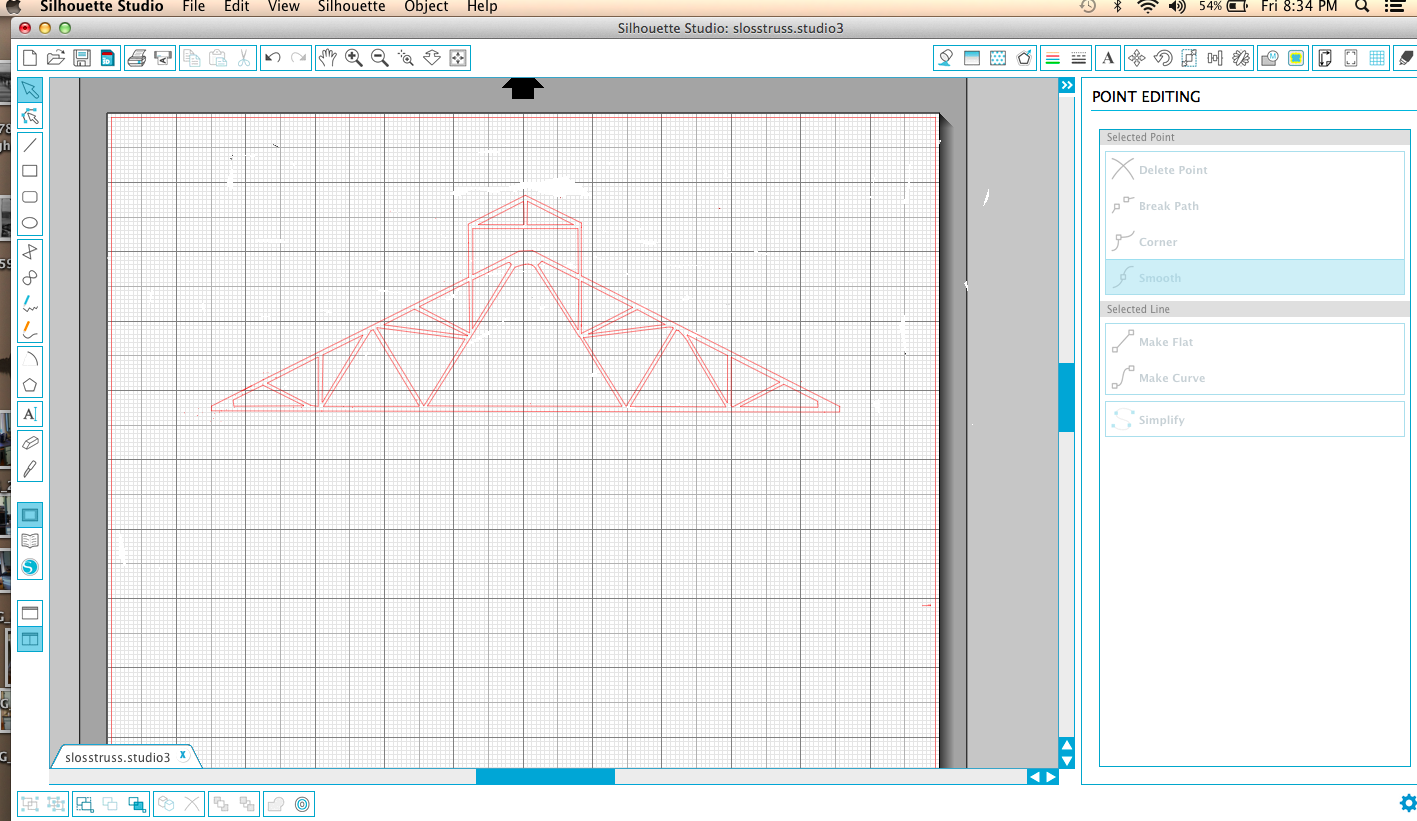
Final cut drawing
This is the final drawing, ready for cutting.   I did rescale the image a little at this point - based on the original drawing, the truss should be roughly 72 feet wide.  In HO scale this works out to be just shy of 10" so I adjusted the drawing using the Scale function to get close to the HO size.  The first cut is about 69 feet so I go pretty close and would be easy to adjust a little more and get perfect.   Merging and cleaning up the image took about an hour.

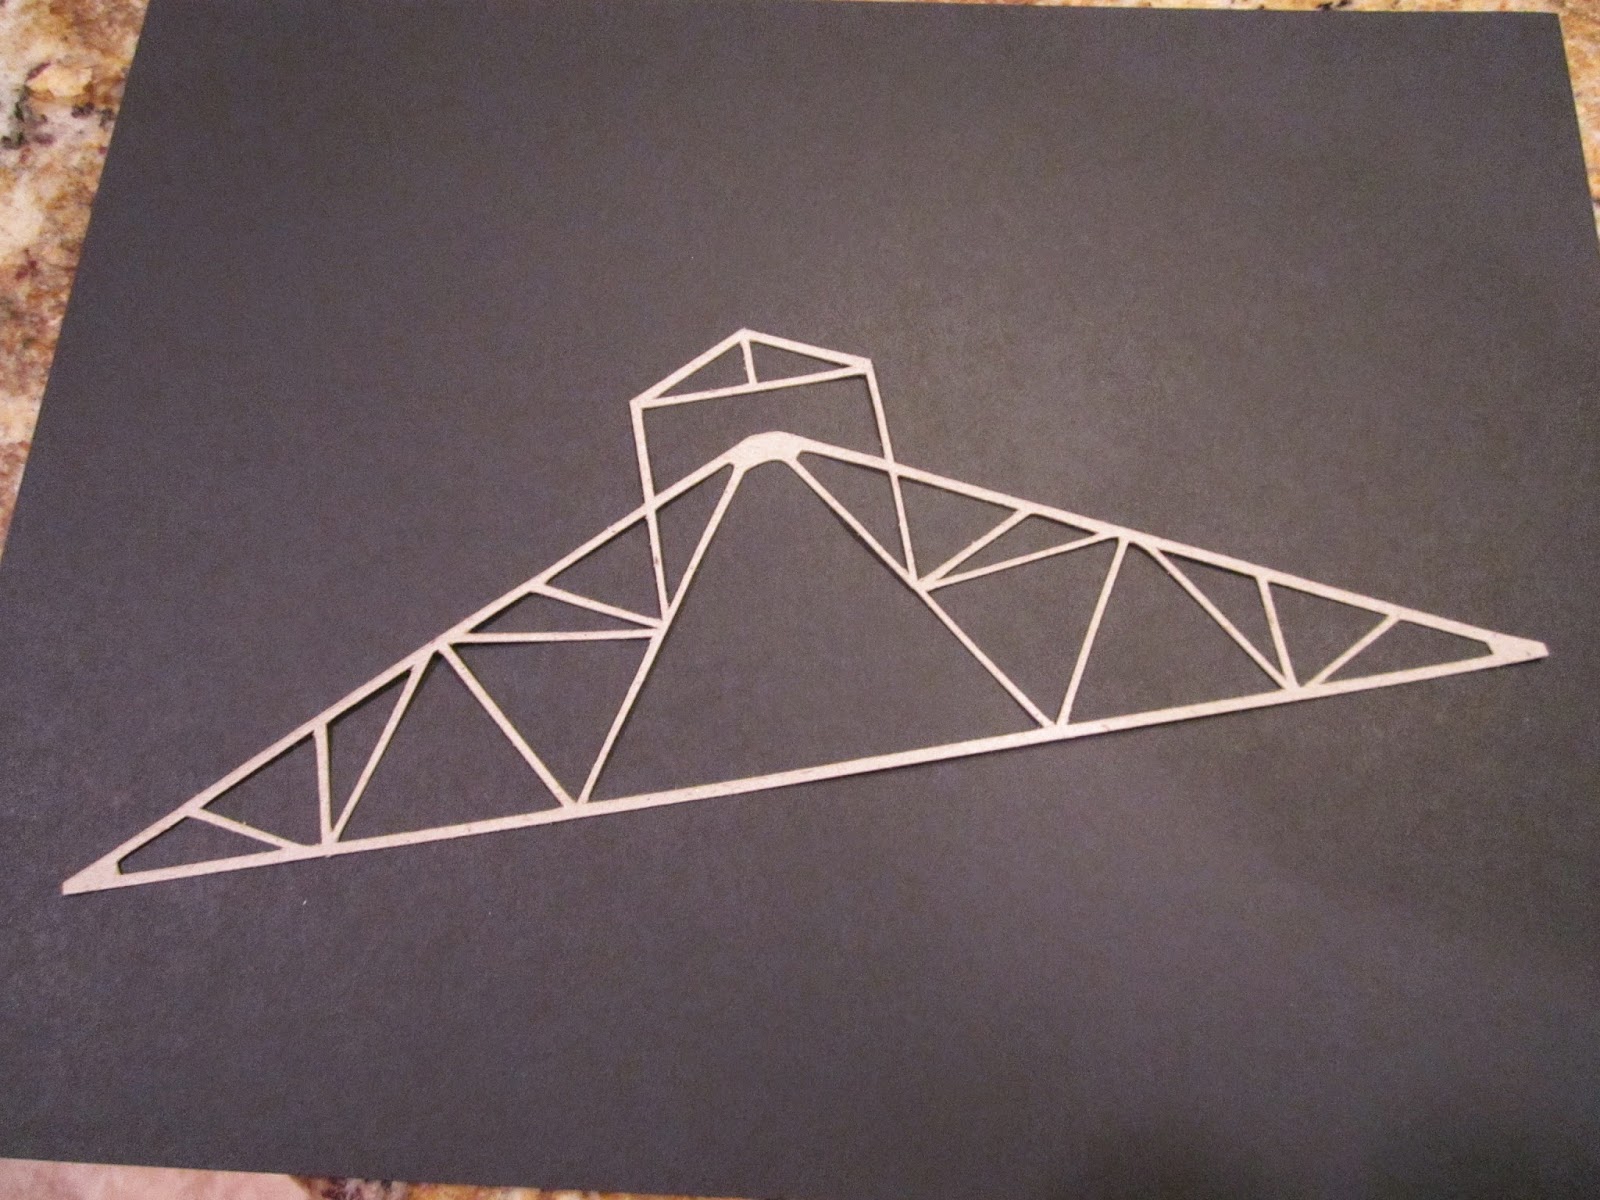
I'm out of .010 plastic so I did a test cut in cardboard stock.  It's easy to copy the entire truss so ultimately this file will have two or three more trusses to fill the page.   Once I get some plastic (tomorrow) I will play around with some options on actual construction.  My plan now is to use this as the core for the truss and just cut and glue on strip styrene or angles to stiffen and give the truss depth.   I'm very happy with the results.   I will probably use these trusses for the roof of my to be built rod mill.   After I publish this entry I'm actually going to cut another truss or two and explore using the cardboard (it's called chipboard by Silhouette) as the truss - laminating them.  Just an idea.