Friday, November 26, 2010

R&H CHEMICAL PLANT Part 2


Started work on the water tower structure using DPM modular wall sections with a little bashing for the gable roof.

ELECTRONICS Part - 2


This is a continuation of a subject that will pop up on occasion - electrical issues on my layout.  I know a bit about electronics but am by no means an expert, so I will try to keep it simple.   I intend on using a fair number of LEDs to light my layout.  I like their longevity and their efficiency, but also realize they have limitations.    One big issue for me is they might work for modernish industrial lighting but for the early 50's, their whitish glow doesn't work well.  They do make yellowish white LEDs but they are a little on the pricy side so I plan on using some translucent stains or paints to see if I can adjust the tone of a LED.  For now, however, a little experimentation - against my better judgement, I found myself in a Home Depot on Black Friday - the $1.98 LED Christmas Light strands caught my eye so I picked up five boxes, figuring on using them for their stated purpose if I couldn't find a model railroad use for them.  
The strands are configured like a traditional light string with the LEDs wired in series.  There are two larger pods inline that must contain resistors or current limiters.   The individual LEDs and their holders can be cut from the string individually, leaving you with a pre-wired LED - no soldering near the device.  It also will allow you to change the LED if it ever burns out.   With this brand, the wire coming out of the locking nub side is the positive.  You can go further and take the LED out of the holder and then take the plastic base off the LED, leaving you with a raw diode - the long lead being the positive.    For hidden wiring just using the LED and its holder should work fine.
I did play around some more, creating a light post from a single LED, some 1/16 tubing and a 1/8 inch H-column.  The LED leads are simply inserted into the tubing (bend the lead a little to insure contact) and then the whole deal is locked together with some epoxy.  The bulb and pole can be painted  to complete the effect.  These lamps might be used against a backdrop so I've left the tubing protrude in order to make my connections.  If this was free standing I'd have to attach wiring to the tubing and route it down the H-column.   I will need to pick up some translucent tint to see if I can adjust the bulb color.    A 2 or 3 volt power supply will work fine with this set up.

Thursday, November 25, 2010

R&H CHEMICAL PLANT Part 1


Happy Thanksgiving all.   After rebuilding all the trackage in the port area of my layout, I now have an actual siding for the R&H Chemical Plant.  This company, actually in the era of my layout, a division of DuPont, was a manufacturer of a variety of chemicals for many years, with their plant located a few blocks from the Perth Amboy waterfront, near the Lehigh Valley coal docks.  So fittingly, I have saved a block of land just under the coal dock to represent this prototype facility.  In the 1980s, the plant was still standing and I think I might have taken a photo or two but I can't find any.  I have a vague recollection of what it looked like - similar to the historic photo I've posted on here, with the addition of some more modern process equipment, piping, and tankage.  As with many of America's early chemical industries, this company was founded by German immigrants and thus the European look of many of these early chemical plants.  R&H was unique in that it was built, and largely confined to a two block lot in a fully developed city.   The lot was so tight and lacking of expansion room that there was not enough room for the railroad street trackage to make a turn into the plant.  A type of turntable was used to move cars into the plant on a spur perpendicular to the street track.   This would make an interesting modeling challenge but I didn't have the room, and I actually had enough room for a curved spur.  Since this plant is located against the backdrop I once again have the benefit of only modeling a portion of the plant to represent the whole.    
In looking for brick building kits to represent the buildings in this plant I had looked at a few Kibri structures but in the end choose the Walther's Greatland Sugar Refining kit as the closest for what I needed.  This kit comes with three buildings - a brick storehouse (R&H had a bunch of these), a small boilerhouse, and a main manufacturing building.  This kit, by the way, appears to have been discontinued.  I found one on ebay for $20 less than the list price, but they are sure to go up once it becomes clear they aren't available.   
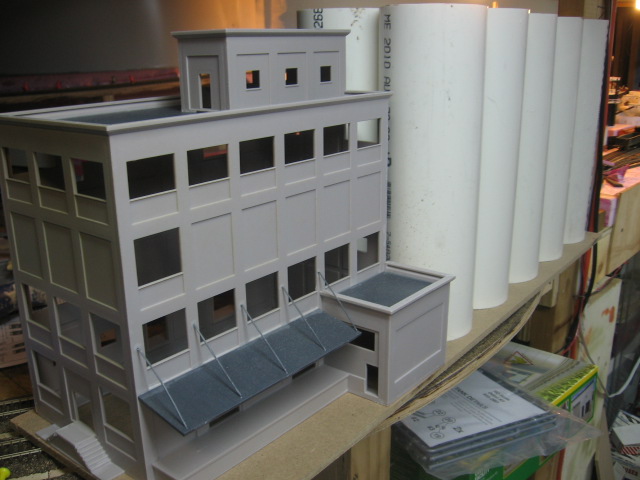
I am using the two smaller buildings as is, with relatively little modification, however, the larger structure needs to be extensively kitbashed.   The main production building had a taller section in the front, dropping a story for the rest of the building.  Additionally there was an even taller attached tower structure with a water tank ontop.  I am modeling the tower using DPM modular parts.  For the main building I took the kit side walls and cut off two sections for the taller front - you can't just lop off on side due to the extension wall at the top so you actually have to take a piece from each end and join them.   Once you do this for both sides, taking care to reverse the cut side on the pilasters so you are left with opposite building sides for the rest of the structure, you can assemble the front four walls and tow roof panels.  For the lower rear section of the building you need to again cut off two sides and join them - first take off the foundation and then cut the remaining panel off so the window will line up with the front section.  Rejoin the side pieces and then install them on the kit base behind the front section using the non-pilaster edge to join to the front.      

Sunday, November 21, 2010

FREE-MO PART 3


I've started work on the structures for the next two Free-Mo modules - our Portland Cement Plant.  Off to a pretty good start but at some point we will have to construct the actual modules, but for now, structure modeling.   There are many structures on the two modules and so far I have worked on the bagging house/rail loading facility and the secondary crusher.  The plant will be a mix of scratchbuilding and kitbashing and should be interesting, however, I am posting the day-to-day type modeling stuff on Model Railroad Forums      This is one of several forums I visit pretty much daily.  It features some fine modeling and I figured it was time for me to contribute.  You don't need to join anything to read my posts.

Tuesday, November 9, 2010

PRECIPITATORS Part 12


Not a lot of steel mill modeling to report.  Besides the modular trip and working weekends a lot there hasn't been too much time left for model railroading.   We were able to attend to some benchwork and track issues in the past few weeks, with the goal of finishing the mainline loop by Christmas.  Last week we installed all new track in the port area, reconfiguring things there, much to the better I would say.  Jimmy has already done some heavy switching to test things out.  The tracks are all wired and hooked to a PSX breaker board.  I just need to add three more Tortices and then wire the control panel and we will be done there.  I now have a spur for R&H Chemical Works, in addition to Atlas Cement and a three track dock/yard.  I have been looking for specific kits to modify for the chemical works without luck so far, but might shift to plan B - modify a Walters Greatland Sugar Refinery.    About four feet of the main line and engine service facility area is benchworked and has roadbed down.  We have also added about six feet of elevated benchwork to connect to the coal dock - we are sloping downgrade as we go.  Jimmy was quite happy to see this work started as I think he thought we were never going to connect with the coal dock.  
I did assemble some of the stair towers I spoke about in the previous post.  As I said in that post two towers come in each kit, along with a whole bunch of flat platforms and piping and other detail items (see on photo - sprues in background are additional parts)  For $15 or so it's a bargain compared to how much it would cost in Plastruct stairs and railings and structural parts to build something similar.  Not to mention the time you save.  I have figured on using two and a half for the two towers in the Precipitator Complex - the first is done as shown in the photo with modifications made to the top platform as shown, using mostly parts in the kit with a few from Plastruct and a small Tichy stair section.   I built the second tower but I need one more section to get to the right height so I will have to wait until my local hobby store gets me additional kits.  I also will probably use a tower on the gas washer structure - several sections here, and also I might fit one in on the B-Furnace topworks.   There will probably be another half dozen sites where they will come in handy too.  

Friday, November 5, 2010

Timonium Finds


Besides our Free-mo activities at the Timonium train show, I also had some serious time to look around.  In the past I've usually not had nearly as much time to look at what everyone was selling. I usually try to focus on finding things that I won't be able to get elsewhere.  A couple things worth mentioning for the steel mill modeler - 
1. Fermentation Tank Detail Kit - Not the tanks themselves but the detail kit that is sold separately for $15 or so has a great industrial stair tower, actually two in the bag, along with some walkways, piping, ...etc.  If you've ever tried to build a stair tower from scratch,  it isn't easy - and you spend some money on plastruct stair parts.   I already put an order in at the local hobby shop for a half dozen of these.  In the immediate future I will be using these stair towers on my precipitators, probably my gas washer complex, and if I can fit one, B-Furnace.
2.  Steel Giants - awesome book, a must for every steel mill modeler.  This large hardcover book is full of photos of USS Gary during the 1900s, including construction photos.  Great photos.

Tuesday, November 2, 2010

FREE-MO PART 2


In the ever continuing Free-Mo saga, we found ourselves at the Timonium train show this past weekend participating in the second Free-Mo module set up of the Capital Area Free-Mo Group.  We had about six modules, most in the unfinished or semi-finished stage, but that is double what we had a month or so ago.  Despite having to drive down very early saturday, set up - and then drive back to NJ for a wedding, and then back down on sunday for the day, we still had a blast.  Jimmy, as usual, spent most of the time we were there switching the modules - this time, in addition to our pipe foundry, he had the Boston Street Terminal module to switch too, plus a few more feet of mainline than he did last time.  All in all the event was a lot of fun, and more importantly, inspiring and motivating - we'd like to bring a few more modules next show (February) in addition to finishing the module we already have.